Scud
-
Posts
3,956 -
Joined
-
Last visited
-
Days Won
245
Content Type
Profiles
Forums
Events
Gallery
Community Map
Everything posted by Scud
-

ANSWERED Thread damage on sump ring - advice needed
Scud replied to Scud's topic in Technical Topics
I already got it back together with new fasteners and anti-seize, and it seems to be holding (225 miles this morning). I am still concerned about the durability of the two that I tapped - the tap took a lot of material out of the worst of those. This is excellent advice about making studs, thanks. Now I know I don't have to be on the lookout for a used part. As for aesthetics, the oil-pan bolt heads are all hidden by the chin spoiler, so I can't see them anyway - but look at that "Roper-line." -
ANSWERED Thread damage on sump ring - advice needed
Scud replied to Scud's topic in Technical Topics
JB - I had the plate on my desk for a while, waiting for the oil change, which seemed like the most convenient time to install it. I don't launch hard or do wheelies, but I have been to known to grab a handful of throttle on the way up a mountain. For where we live, that's what convinced me to put the plate in. It's easy to imagine sucking air into the oil pump during a fast, steep, uphill right-hander. The upper sump came out easily for me (and the instructions I linked to in my first post were invaluable), but some bolts had a rubbery adhesive on them that needed to be removed. I used all new gaskets as recommended, but the gaskets I removed were in great shape. Never seen the oil light flicker either, but I've ridden with some damn fast grandpas... -
ANSWERED Thread damage on sump ring - advice needed
Scud replied to Scud's topic in Technical Topics
All buttoned up and WOT tested. Here's a photo showing how much more room there is for oil in my bike (dipstick screwed in). I'm pretty sure all the oil drained out when I put the plate in, because all the lines had to be disconnected. I added 3.5 litres and ran it a while. The oil level is about at the full mark - so I could easily run with 4 litres or more. Basically, the original full mark becomes the new low-oil mark. More oil, less worries. Having done the project, I finally understand what has already been explained many times: Technically here: http://www.v11lemans.com/forums/index.php?showtopic=13096 And with some extra flavor here: http://www.v11lemans.com/forums/index.php?showtopic=14318&hl=%2Bdipstick+%2Broper+%2Bplate Wow, there's a been a lot of discussion about this plate in past... Thanks again to Pete for a good product.
-
You could take a look at the Moto Guzzi 1200 Sport, I think the black and white ones are gorgeous. Ducatis with the 1000DS motor are relatively less expensive to maintain than some of the higher-tech motors. KTM Super Duke is another nice option in the big-twin sporting department. I've had a couple BMWs (too pedestrian...) and some other big twins, including the Ducati Sport 1000 (uncomfortable for long rides...). The V11 is, at least for me, my favorite bike of all time. I've been thinking "why did I wait so long to get a Moto Guzzi?" It ticks all the boxes for me. Have fun deciding.
-
ANSWERED Thread damage on sump ring - advice needed
Scud replied to Scud's topic in Technical Topics
Thanks. I tapped them and it seems like it will be alright. I get really nervous about stripped or weakened things that hold the oil in the bike... In other news, I can report that Nobleswood's ex-boots are waterproof. -
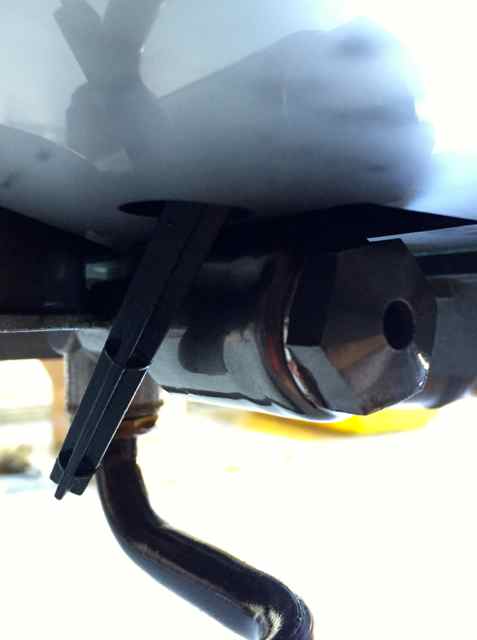
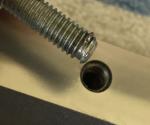
I'm mid-point on installation of the Roper Plate on my Scura, following steps on this thread: http://www.v11lemans.com/forums/index.php?showtopic=8985&hl=%20greg%20%20field%20%20roper I've run into a problem with two bolts from the lower sump (pan) to threads on the upper sump part (square ring): Here is a closeup of the worst one: It appears to have seized and brought a chunk of thread out with it. I cannot easily thread a good bolt into this receiver. As lessons go, this one is about using anti-seize compound. However, it wasn't me....... Advice needed/Questions: Repair or replace being the first one - obviously I need to replace the two damaged bolts, but can the threads on the square ring be saved? Should I try a tap (will need to buy one) - or am I likely to need to visit a machine shop? Background: Since it was in hibernation for 12 years, and I had the dealer do the break-in service, this is my first oil change on the bike, and the first time the sump has been off since it left the factory. Only two bolts for the lower sump came out hard, the balance easily. All the bolts for the upper sump came out easily. Just for entertainment value: The bike was a bit shy of 6,000 total miles, so I decided to take it for a spin this morning before service and installing the Roper Plate. There was a 0% chance of rain. I got absolutely soaked and did 80 miles in the rain...
-
@ nobleswood: what does "prefer" mean? I prefer the look of the Scura's fairing and I like seeing all the mechanical stuff up front. IMO the Scura and Cafe Sport are the most attractive bikes in the V11 series, rolling art... but the Cafe Sport is better sorted (engine paint, no flywheel-bomb, fuel pump system, etc). I prefer the wind protection and lower ambient noise of the LeMans fairing at higher speeds; I can tuck into that fairing and get all the way under the wind bubble if I want to. I thought the LeMans fairing would be a bit of a PITA for maintenance, but I can remove the tank and/or valve covers without removing the fairing - so it's not a pre-step to most maintenance. @Ken Are the instruments and lights mounted to the frame on the Cafe Sport? I assumed they would be fork-mounted, like the Scura and your red-frame sport. BTW - I had a BMW R100CS with the same fairing as you have on your black bike. I always thought that was a beautiful design (and something of an anomaly for BMW). I think that fairing looks fantastic on your black V11. Have you considered swapping some brackets between the two bikes? I think the BMW S fairing would be sweet on the Cafe Sport - especially if you paint it to match the tank.
-
A woman goes to the doctor. The doctor tells her "You have three months to live." The woman says, "Oh no, that's terrible. Isn't there anything I could do?" The doctor says, "You could marry an accountant." "Marry an accountant?" the woman replies, "How will that help my condition?" "Well, it won't help your condition," says the doctor, "but it will make your last three months seem like forever."
-
Agreed. Absolutely silly to have 2 of them. Congratulations on the Cafe Sport and best of luck with the sale. The Laverda fairing is lovely, but I think it would require modification to the bars. Do you like the LeMans fairing? Mine had higher bars on when I got it - so it might be an easy fit for you with the Cafe's bars. If you're going to pitch the gauges, that gives you even more flexibility with fairings and lights. Ghezzi-Brian has some attractive options. - Silly
-
Loose, Rattling Front Crossover on 2003 V11 LeMans
Scud replied to Rhino1's topic in Technical Topics
PDoz - wish I could give you a very clear answer. However, I changed a lot of things at the same time as I had the crossover welded. I have not got the 03 LeMans in perfect tune yet, but my remaining problems are occasional and at idle; it runs brilliantly. I am not worried at all about deleting the crossover. As an additional data point, I have the Kit Racing ECU, which may or may not have been modified... The welds are not noticeable from most angles. They remind me of vestigial horse toes (aka chestnuts). In the picture you can also see where the crossover pipe was rubbing on the alternator cover. That being said, I think the most compelling answer for you would need to come from someone who changed only the pipes and could give you a before/after report.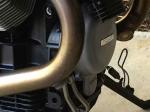
-
My throttle bodies were a mess too. I wrote that procedure because it was my first time tuning this bike; I failed twice, and I had some conflicting sets of instructions. I had some extra challenges, because I am undoing a lot of modifications - and I'm not sure if the Kit Racing ECU programming was modified. Here's a link in case it's helpful: http://www.v11lemans.com/forums/index.php?showtopic=18967&page=5 You will need to endure a tractor joke on the way to useful stuff at post #66. Delman - it sounds like yours was recently running well and I assume you have not changed any equipment. So the process should work well for you. Be slow and meticulous - maybe you can get it right the first time.
-
Hey Stew - Sounds like you've got some answers already. Speedo: Our bikes don't have a speedo sensor, they only have a mechanically driven cable - so there's nothing for the new gauge to be compatible with. KiwiRoy installed a sensor (I think he made it himself ). That part of the project was intimidating to me, and I thought the GPS speedo was cool, and easier to install - magic speedo signal from thin air... Warning lights: There are a shed-load (in America we say shit-load) of wires into that T-shape between the gauges. Make sure your new gauge will replace all the functions: oil pressure warning, charging warning, neutral, turn signals, high beams. If your new all-in-one doesn't do some of the functions, then you will probably want to put some other warning lights in. Not messing with all those wires was one my primary motivators to keep the stock appearance - plus the plastic gauge cup protects them from the elements. From my own recent experience - try to talk with a technician before you order. That would have saved me some time and rework. The job was a little scary to me - but I just went slowly and got friendly with my multi-meter. Good learning experience.
-
You asked for obvious issues, and having just my replaced gauges, here are a few questions you might ask yourself during the planning phase. How will you mount the gauge(s)? Will one of their brackets bolt directly to something on the V11 - or will some fabrication be required? How will you produce a signal for the speedometer? What will you do with all the warning lights? Does the new gauge replace all the functions - or will you be stuck wondering where the put the stock lights you still want to use? Are the gauges waterproof? - especially important for a naked bike in the UK... Do you want an oil pressure gauge or voltmeter while you're at it? The thread Installing Speedhut Gauges shows where you can pick up power and signals from existing dash wires (it was nice to be able to re-use wires from the ITI units). I don't have much electrical experience, but I managed to get them to work by following the manufacturer's instructions and With a Little Help from My Friends.
-
I removed the gauges and am sending them in for a re-do. I do regret getting the buttons on the faces and not getting the logos, but was willing to live with it. But I remained concerned about the size and accuracy of the oil pressure sender. Then I went for a night ride and the four white gauges were just too much (even though I did like them during the day). So I am going to copy Chamberlin's setup - imitation sometimes really is the most sincere form of flattery. The changes will cost me about $185 as follows: $90 is to upgrade to the better oil pressure gauge with smaller sender (this is just the difference in price between the two gauges; they are giving me full credit for the one I'm returning). The sender for the entry-level gauge just seems like too much weight at an angle on aluminum threads in the block - and the sender is apparently prone to problems. My first sender was bad. The technician didn't even question it, I guess they have had several problems with that sender. $40 is for options that I didn't originally choose: $10 each for remote buttons and $10 each for logos. The balance is for new faces, two of which need to be done anyway to get rid of the holes for the buttons. Rationalization alert: since I caught their 15% off sale in March, my total cost after re-do is about the same as I would have paid at any other time. This is how I make myself feel better... There are a lot of options that are not obvious during the ordering process. For example, you can get an inverter with a dimmer (to make the white gauges bearable at night). So, for anyone else considering Speedhut, try to talk with a technician before ordering. Let me just echo Roy's enthusiasm for Speedhut's flexibility. I'm amazed that they will take these back and re-work them. Only the oil gauge is a problem, the other changes are just my preferences. I can't think of another company that will re-work custom-ordered product after it's been installed.
-
Thanks Lee - I edited the post to include the fan. I'm going to keep at that procedure till it works... It had perfect manners on my short commute this morning, then was a little fussy on the way home, so I'm still puzzled. I hope the GuzziDiag software will help. I think I will test the air and oil temperature sensors too - because when I got the bike, the air sensor was relocated and the oil temp sensor was totally disconnected.
-
If it was difficult to install, perhaps something else in the exhaust system is out of alignment - or since it was not there before, maybe you don't have all the bits and washers that are supposed to be included. I think the purpose is to reduce vibration and therefore wear at the four pipe connections at the crossover - probably not something you would feel. But it's always a good day for a BRAAAAP.
-
Thanks, I went for a canyon raid last night. It was flawless until I went through a series of stoplights after running hard, when it actually stalled at idle once. It was fussy through the town, then I took the freeway home and it idled perfectly again after that. The Kit Racing instructions have ALL CAPS warnings about the exact engine temperature at which certain adjustments (including the CO) should be made. And a final ALL CAP warning about the CO adjustment. Not having a way to measure engine temperature, I guessed. But I will go through it once more when I get the Guzzidiag figured out - and we will see what the story is with the CO. It's getting better and better...
-
Good news. I've got it running really sweet, with stable idle, and without hiccups. My test was only 10 miles, but I forced myself to do most of it at low RPMs to give it plenty of opportunity to misbehave. I'm reserving judgement until I have done a few days of commuting, several cold and hot starts, and a proper spirited ride, but I am optimistic. Given this is still my first attempt at tuning a V11, and after reading two sets of instructions, with different sequences, I tried to merge them. Following are my steps, including one that was not on either set of instructions (the Mechanical Balance). I got the idea from something Luhbo mentioned (can't recall where). Tuning Procedure Mechanical Baseline Set intakes to .006” and exhausts to .008” Fresh and correctly gapped spark plugs, clean air filter, clean throttle bodies, etc. TPS Baseline Connect TPS Breakout harness and voltmeter. Back off cold idle speed cam (aka choke cam). Disconnect throttle connecting rod under RH throttle body. Back off RH idle speed screw so it does not touch. Turn on ignition (don’t start). Adjust TPS to read 150mv (turn the TPS unit to adjust). Adjust RH idle speed screw to desired TPS setting: (465mv for Kit Racing ECU on 2002/03 bikes; 521mv for stock ECU; 550mv for Kit Racing ECU on 2001 bikes) Disconnect TPS breakout harness (reconnect wires on bike). Reconnect throttle connecting rod and set LH idle screw so it just makes contact with lever. Warm up the bike, then turn it off. Have a fan available for airflow during remaining tests. Low Speed Vacuum Balance Connect manometer or other vacuum gauge. Close air bypass screws. Disconnect throttle connecting rod. Start engine. Adjust LH idle speed screw until cylinders are balanced. Stop engine. Mechanical Balance (note that this step may not be necessary if bike was already in decent tune) Reconnect throttle connecting rod. Adjust white balance knob until both throttle stop levers make contact to the idle screws. Use the smallest feeler gauge available until it has the same sliding friction on both sides. High Speed Balance: Start engine. Test balance at 2-3,000 RPM Adjust white balance knob for balance at 2-3,000 RPM. Stop engine. Final Idle Speed and Balance Open air bypass screws the same amount on each side. I used 1/2 turn. Start engine. Adjust the air bypass screws until balance is achieved at the desired idle speed. (note - I left one side at 1/2 turn and opened the other side until balance was achieved, this way, both bypass screws will by open a minimum of 1/2 turn) Use LH idle screw to increase idle speed to desired level - (consider adjusting RH idle screw until it makes contact to lever) Stop engine. Get Done Disconnect Manometer. Reattach caps or hoses to vacuum test ports. Reset the cold idle (aka choke) cam. Clean up and go for a ride. So - there's an afternoon project... I've been eager to get the LeMans sorted, because the Scura is due for its first 6,000 mile service. I will try the above tuning process with the Scura too - it's been needing a little more time on the starter button lately, not firing up at first touch. I'd appreciate any corrections or adjustments from you experienced tuners. I tried to document everything, but there may be errors.
-
Now there's a proper tire review with awareness of bias/limitations, and plenty of irrational exuberance. I also have a hard time comparing tires - the new tires are always better than the take-offs.
-
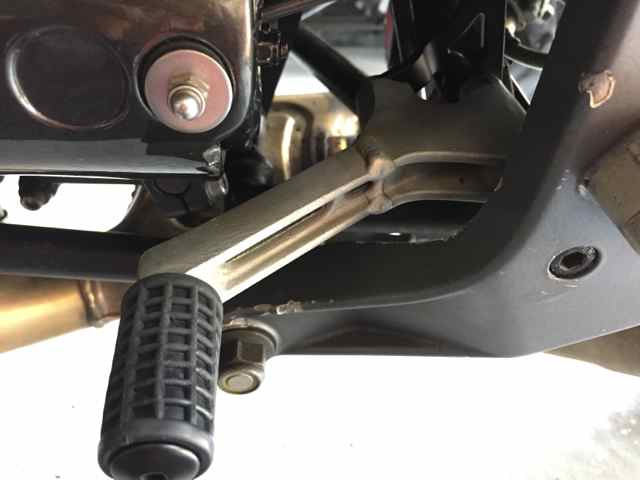
I recently bought a 2003 that had been down. This welded gear-shift lever was in the box of spare parts. I reinstalled it (after removing a different set up). I also ordered the replacement lever from Harper's, which I am expecting any day now. For your situation, it may be possible to weld the lever if you don't mind it a little shorter (as in the picture). I thought it would bug me, but it works fine. As soon as my new lever arrives, I could be easily persuaded to part with this welded lever, send me a PM if you want it. I don't know your situation, but if the bike has been down, be aware of other potential damage to the related parts. I had a very hard time getting the lever back on until I realized that the long pivot bolt was bent and the frame tab that the pivot bolt goes to was bent. Both bends were very slight, but they were enough to make it impossible to get the bolt started without cross-threading. I pitched the bent pivot bolt, but I also have a spare straight one if you need it.

-
Ah... CO, I mis-remembered. That's why I couldn't find it again. I already have the ECU cable and just ordered an OBD2 to USB cable. Just downloaded the GuzziDiag software. This seems to be the thread to figure out what to do with it: http://www.v11lemans.com/forums/index.php?showtopic=17865&hl=guzzidiag%C2%A0).&page=1 Throttle bodies recently cleaned, including air bypass screws removed and cleaned. Also found this regarding setup/tuning with the Kit Racing ECU and Titanium exhaust, which does show a different TPS setting than stock system. http://www.v11lemans.com/forums/index.php?showtopic=18661 On reading these instructions, it seems that I failed to do all the steps correctly. That makes twice now... but different errors. Third time's the charm?
-
I stopped by the local dealer today... On a more serious note: I've gone through the TPS and throttle body balance sequence again. It's "running" beautifully, but not "walking" so well. Idle speed is inconsistent (from about a low of 1,100 to high of 1,700, and most frequently about 1,500) and it seems like it could stall at the lower idle. It burps occasionally around 3,000 to 3,500 RPM. Planned actions and questions: I'm going to replace the throttle cable as soon as it arrives (I recently noticed a frayed strand and bend from previous high-bar mount) Based on another thread I saw today, I think I will disconnect, clean, and reconnect the ECU. Should I be using some different TPS or other settings because of the Kit Racing ECU and pipes? What's the deal with the oxygen settings? I've seen this mentioned a few times, but I don't know what to do or what tools I would need. What else should I be looking at? If anybody has ideas, and there are how-to or other documents, feel free to post a link, rather than re-explain.
-
"Darkness on Fire." I like that. Makes me think of the heroine from The Hunger Games. I think a full black and red treatment is probably where this is going cosmetically. I've let go of the white stripe idea. I find working on bikes (and cars) myself to be an enjoyable activity in its own right. But there are other benefits, such as cost savings and the ability to fix something on the road if needed. Downloading some manuals from the fileshare section of this site, or This Old Tractor would be a good start. You can download the shop manual in French at this link: http://www.thisoldtractor.com/moto_guzzi_misc_workshop_manuals___shop_manuals___service_manuals.html
-
The above-referenced resources and browsing through the gallery images will help you see what's on the menu. Here's my experience: 2002 Scura: bad engine paint, PEFS (potentially exploding flywheel syndrome), Ohlins suspension (excellent), lots of carbon fiber (which benefits the bike in the same way that a haircut benefits an overweight person), "limited" production, and the matte black... 2003 LeMans in comparison: better wind protection from the frame-mounted fairing, easier to remove tank for service due to different fuel pump and filter arrangement, top of tank is smooth (no raised pad in the middle), Marzocchi/Sachs suspension works, but wants to be upgraded. There are a few other differences, but nothing really big. They're fantastic bikes - and wonderful platforms to customize and make your own. People have been posting ads as they find them in this thread: http://www.v11lemans.com/forums/index.php?showtopic=18375&hl=craigslist&page=10
-
Update: Brian responded with an apology, a promise to make a stronger bracket, and a discounted price for me to get a paintable belly pan (chin spoiler) for my LeMans along with a replacement fender (and new bracket). The US Dollar has strengthened against the Euro since I originally bought it, so that feels like an even deeper discount. I think this is a fair and acceptable solution. G&B seem like great people, and I'm looking forward to testing the new fender bracket.