
Scud
-
Posts
4,123 -
Joined
-
Last visited
-
Days Won
253
Content Type
Profiles
Forums
Events
Gallery
Community Map
Everything posted by Scud
-
I can't speak to that specific combination. But just a couple days ago I put a Pirelli Angel GT on the front, to accompany the still-good Michelin Pilot Road 2 on the rear. Very pleased with the handling. I prefer to run matched tires but I don't worry about a little transition time with an unmatched set. I plan to put the Angel on the back when needed. Good time to put in an angled valve stem for easy access.
-
Thanks for the info. My oil pressure sender is where the stock unit used to be. I assume pressure should be about the same between the two points. Your start up is similar to what I see, and your peak pressures are a bit higher than I get at first. You don't see pressure drop when it warms up? What weight oil are you using - and is it organic, or synthetic?
-
I'm not sure that I'm happy (or unhappy) with the pressure readings. But I am sure that if I had only a warning light that I would be ignorant of the pressure readings, and not have even started this thread, I would just be riding the bike (as I have been doing). What I'm trying to do is to figure out what makes sense. The above-referenced conversation (post #7) on the automotive engineer site really challenged my thinking. Of course, I am not disputing the need for oil pressure and proper lubrication. But as I am currently understanding it, a high oil pressure number just shows how much the oil is being held back, not how much it is flowing. The idea that a lower pressure number can be good - and can indicate more oil flow and better cooling - is new to me. The "bleeding somewhere" could be fast flow through all the places the oil is supposed to go, which would be good. So - I'm not trying to be right, and certainly not trying to do harm, just trying to learn by paying attention to the data. Hopefully we can get a direct comparison with someone else's experience.
-
Took it out again last evening - 60 miles without incident. The pressure held constant at 40 PSI / 4000 RPM for the first couple miles - then I actually watched it drop while I maintained constant speed and warmed up the bike. Given that the system is capable of holding high pressure with cold oil (I saw close to 60 max PSI) and lower pressure with hot oil, it seems there is not a mechanical problem. I have put a lot miles on it the last few months without being aware of the exact pressure readings - including some pretty hard running in the heat, and no problems/noises. Here is what I've surmised from reading too much... Pure, 100% synthetic oils (like the Maxima I am using) do produce lower pressures. This is because the synthetic molecules are all the same shape, whereas the organic molecule shapres are diverse. The diversity in shape creates more back-pressure as they all squeeze through tight bearing clearances. This is also why synthetic oils are considered slipperier - and perhaps also why they are more prone to seepage. Some things I read talked about pressure drops up to 10PSI when compared to organic oils. Piston sprayers (as installed on 2003 and later V11s) reduce oil pressure - sort of like when you turn on multiple faucets in your home. There is still sufficient flow, but there is less back pressure because the 2003 engines have two more "faucets" open than earlier engines. While I think the "alarm bells" are no longer ringing, I'm still interested in comparative data. Who's got a pressure gauge on a 2003 or later engine? What oil are you using and what pressures do you see?
-
Fantastic. It will be good to have confidence in the bike again. Also good to know that the slave cylinder can be reconditioned. "The case is one where we have been compelled to reason backward from effects to causes." -- Sherlock Holmes
-
At least it's clean, light oil, not dirty final drive gear oil. Maybe you could smother 'em in corn starch? Same principle as throwing your phone in a bowl of dry rice after it goes swimming
-
Camera on phone, no photoshop (but sometimes I do press "enhance" to fix the color of photos)... and I smell Simple Green. I degreased that slimy pig for hours - and thanks for noticing. The shock, of course, is clean because it is new. A little powdercoating here and there... and some new fasteners... and a little OMGD (Obsessive Moto Guzzi Disorder).
-
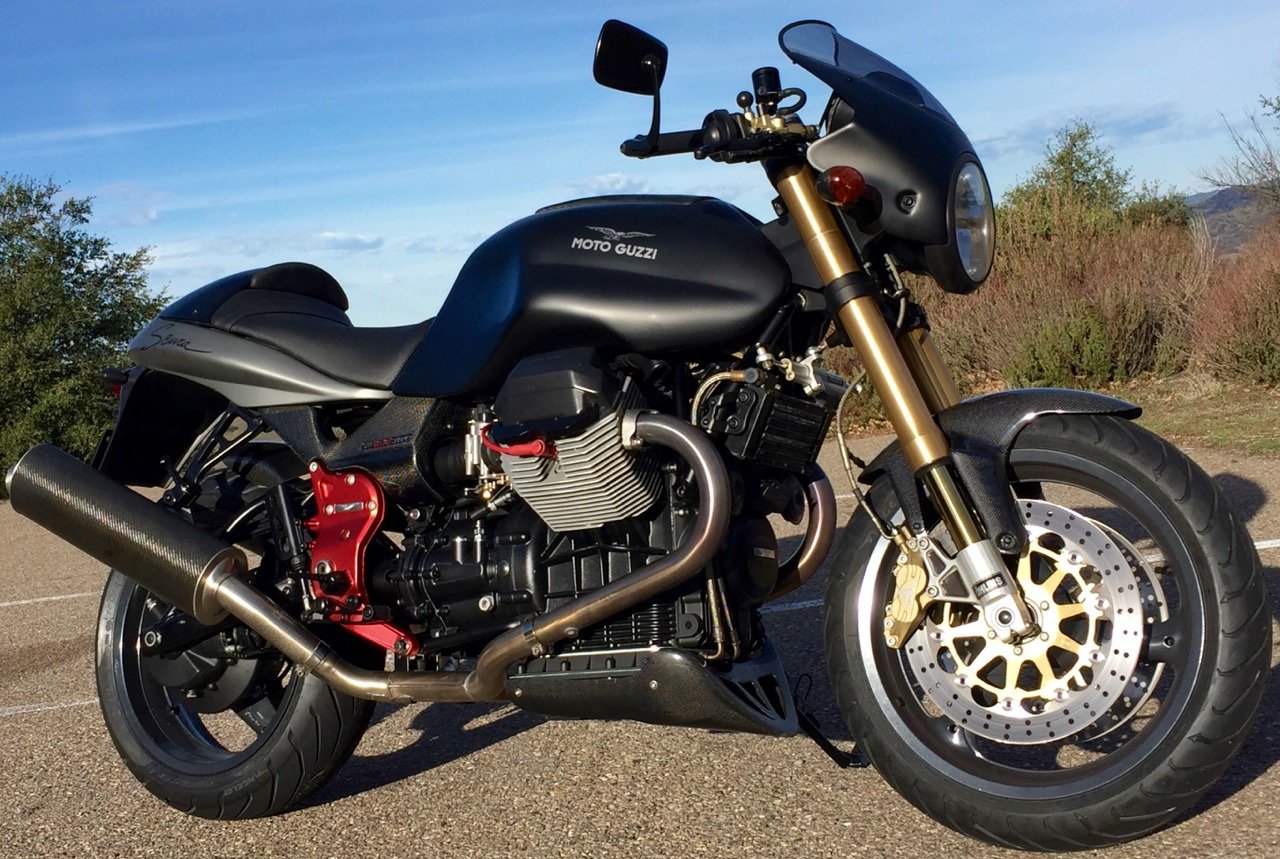
Figured it's about time to update this thread. I got the re-worked gauges installed, but am now having some uncertainty regarding oil pressure reading, which I posted elsewhere. I am super-stoked with the look of the gauges in black, the remote button, logos, soft blue lights at night... One thing I'm not pleased with: the black anodized plug guards (from Harper's) are already fading and discoloring towards purple-ish. No big deal, because I planned to include them next trip to the powder-coaters anyway - but just a head's up that the color doesn't even last for 1,000 miles. Thy Hyperpro 460 shock is a real treat. That, along with a new Pirelli Angel GT up front made a huge positive difference in handling. I also like the black spring instead of the white one. While I was at it, I put an 83-degree angle valve stem on the front wheel (so easy... can't recommend these strongly enough). And what has to be the best coolness-per-dollar thing ever: reflective stripe tape on the wheels, only $10. I've been commuting on it all month. It's still got a small, occasional hiccup... just a minor irritant... but it will get sorted... all part of the fun.
-
Thanks. I had the sump off recently (I've only had the bike a couple months) and all was good. Verified clean surface for the UFI filter, good gasket, etc. I just ordered a WIX filter to have on hand in case I need to get into the engine again. I know the oil-pressure topic has come up frequently, and I just reviewed this thread: http://www.v11lemans.com/forums/index.php?showtopic=17027&page=1 However, given that I had much higher pressure readings with the previous gauge, it seems like it's time for me to buy an external, mechanical gauge that I could use on any vehicle. If I can run that in tandem with my new, electronic pressure gauge it will help with the diagnosis.
-
Doing a little reading on the topic, I chanced upon a discussion forum for automotive engineers. It seems they don't really concern themselves with pressure very much. One engineer said "...any positive number should be acceptable. Customary minimum numbers are basically safety factors." Another talked about differences in pressure due to different weights of oils - and said the differences don't matter so long as there is enough flow. Another actually talked about how thinner oil and lower pressures can be better... because they flow more volume through the bearings. I'm no engineer, but I found this short discussion very interesting - and counterintuitive. I have always assumed that more pressure is generally better. http://www.eng-tips.com/viewthread.cfm?qid=354922 It got me thinking, the 2003 engine has oil sprayers. That's two more exit points for oil - and sprayers would seem to take more flow than bearings (my assumption), but I think the oil pump is the same as earlier models. Considering that, combined with thinner oil than used in the early V11s, one could reasonably expect the 2003 and later engines to run at lower pressures. Anybody running a pressure gauge on a 2003 or later bike?
-
Here's my fresh data: Cold start, idle at about 1,250: 25 PSI Warmed up a bit in the driveway, then rode the first mile or so: the 10PSI/1,000RPM ratio seemed pretty close, but I only took it up to about 4,000 RPM which yielded about 40 PSI. Then as the bike got warmer the pressure dropped. After 2.5 miles to the gas station, I got the following readings with the bike stationary: idle about 1100: about 4PSI 2000 RPM: 8 PSI 4,000 RPM: 20 PSI Then I took a short section of freeway so I could monitor pressure at constant speed. 5,000 RPM: pretty steady 20 PSI 6,000 RPM: the needle moved between about 28 and 32 PSI By the time I got home, the bike was good and hot, and the PSI readings were about the same as at the gas station, but a touch below 20 PSI at 4,000 RPM. The previous oil change showed no metal, screen was clean. UNI oil filter screwed down tight (1 and 1/8 turns after contact). The current oil is still golden-clean; the oil level is still up above the dipstick full mark (checked just now with bike level and stick screwed all the way in). Whatever is going on is not a new problem (if it is a problem). If I only had an oil light, I would be blissfully ignorant of this. But now I have the data....... Anybody else running a pressure gauge with 10w-40 oil? I've got a trip planned in a few days and intend to take the LeMans (along with the Husky) to the mountains. Don't want to take it if I have a problem.
-
Thanks guys, for the input so far. I am not certain that the gauge is accurate. I had a different gauge and pressure sender on previously - all parts from Speedhut. The prior one had a fault and would not read low pressures, but it showed much higher pressures at operating temperatures than I'm getting with the new gauge. The new gauge (which I paid extra to upgrade to) is supposed to be more accurate. My opening post is what I remember from my short ride last evening, but I think I will take a pen and paper out for a little "research expedition." Empiricism shall prevail... One more bit of info: before replacing the stock sender unit, I did notice some flickering of the stock oil warning light at hot idle. @stuart - What oil are you using? What are your other bikes? Maybe add them to your profile? Enquiring minds want to know...
-
Now that I have a functional oil pressure gauge on the LeMans, I'd like to know if my pressure readings make sense. As I understand it, oil flow is what we should truly be concerned about, but since that is hard to measure, oil pressure serves as an indicator of oil flow. Here's the data: Cold Start: Cold idle at about 1,200 RPM: about 15+PSI After the bike warms up: Idle: about 3 to 4 PSI Steady speeds around 4,000 RPM: about 12 to 16 PSI Accelerating: peak pressure about 25 PSI Oil: Maxima 10w-40 ProPlus 100% synthetic (10-40 is specified in 2003 manual) - I used a full gallon at the recent oil change, and the oil level is a bit higher than the dipstick "full" mark. My cause for concern is that the pressure seems very low at hot idle - but since there is SOME pressure, there must also be oil flow. On my first ride with the new gauge, and my first stop for a traffic signal after the motor was fully warmed up, I noticed the pressure gauge needle dropped nearly to zero at idle - which made me nervous. But I can tell that it is registering something (3-4 PSI) and it bumps up with the slightest blip to the throttle. FWIW - I put maybe 500-800 miles on while I was between gauges - so It's been working, but now I am just trying to understand the readings. Questions: Does it seem that I have any cause for concern? Is the big drop at idle between cold and hot because of the multi-viscosity of the oil? Would 20w-50 oil increase pressure slightly? Does anyone run 20w-50 (or thicker) oil in a 2003 or later motor? Correction/Edit: The 2003 manual calls for 5W-40 oil, even thinner.
-
In another thread, PDoz just recommended a cable repair kit to thread new wire into the throttle cable sheath in case of breakage. Thought I'd cross reference it here along with a link to a kit: http://www.amazon.com/Gear-Gremlin-GG150-Cable-Repair/dp/B008U9HO0C/ref=pd_sim_263_2?ie=UTF8&refRID=06330BBBHS3NNTWX18GT This is certainly a "fix it on the road" item.
-
That's a great idea to carry. I just bought one to stash under-seat. http://www.amazon.com/Gear-Gremlin-GG150-Cable-Repair/dp/B008U9HO0C/ref=pd_sim_263_2?ie=UTF8&refRID=06330BBBHS3NNTWX18GT Docc - You are like a one-man tourism and visitor's bureau... always pointing out the unique charms and recreational opportunities available in "Middle Tennessee."
-
I just replaced the throttle cable on my LeMans yesterday. It had a rough spot from a broken strand - and it was bent at the bracket near the throttle body, because it had been under tension from high bars. I could occasionally feel the rough spot when twisting or releasing the throttle. I put well over 1,000 miles on it after I noticed it (not sure how long it was like that). It was still moving freely - never got stuck on the rough spot. To your question - no idea about the soldering, but if it's similar to my experience, I think you will be fine as-is for a few hundred miles. Is there a dealer along the (hopefully winding) route you plan to take? Maybe you can grab a spare on the way.
-
Got the gauges installed again today after the above-referenced rework. Here's the oil pressure sender that goes with the upgraded gauge. It's much smaller and I mounted it with an elbow to keep the wires away from the cylinder fins. This one comes with a wire with quick-disconnect plugs. I also got the remote button option for the tach and speedo so there would not be any holes in the glass. The button is only needed once for the tach (to calibrate to match the pulse per revolution signal) so I did not install the button for that. But I did install the button for the speedo - because it resets the trip meter. I drilled a hole near where the trip reset knob used to be. And here's a look with the bars turned to the left. I used the logos from Chamberlin and copied all his other style choices too. However, I did make the eagle bigger, because I didn't get the extra lights in the gauges, and I asked Speedhut to reverse the eagle on the tach so they face each other. The oil pressure gauge is mounted to the fairing and doesn't turn, so it looks crooked in the picture - but all the gauges are level when the bars are straight.
-
I got the Hyperpro fitted and test-ridden. As you can see by the photo, it only takes two bolts to install the shock... nothing to it. Oh, you have to remove a few things to get access to the two bolts.... Very pleased with a quick 40 mile test run. The bike feels more stable and predictable. The rear wheel maintained contact over some sections that I know caused it to lose contact with the Sachs shock. I should have weighed the two shocks - but I am sure the Hyperpro weighs less, partly because there is no reservoir. The shock came with good instructions and a sheet with a summary of all the data I provided when they built the shock. The spring was pre-set and so was the damping. I did measure sag after installing the shock and it was correct (sag specs were also on the data sheet). It seems everyone has their own method of measuring sag. Hyperpro recommended measuring only hanging free and riderless - not a third measurement with rider and gear. I was able to take those measurements by myself.
-
To remove shift lever: Disconnect shift linkage from lever. Remove nut from the end of the pivot bolt - this is the "trick" - the pivot bolt goes through the "shield" (aka porkchop) to a tab on the frame. The pivot bolt threads into that tab, then a nut goes over the end of the pivot bolt's exposed threads to lock it in place. I used a socket on a long extension with a u-joint to access it from the RH side - all the way through the bike. Once the retaining nut is off, the rest is easy. Then remove the pivot bolt (allen wrench) and the shift lever will slide right out.
-
Nicely done - and nice teamwork. The Guzzi has turned you into an electrician... How many Stews does it take to reverse a light bulb?
-
Here's a sub-1,000 mile, "collector quality" Rosso Corsa for over $9,000: http://losangeles.craigslist.org/sgv/mcd/5092216126.html
-

Best Install Method - Garmin Zumo 660 on '02 Le Mans?
Scud replied to Bob Hartman's topic in 24/7 V11
I use the same Garmin 60-series (a handheld) in a cradle on multiple motorcycles and my mountain bike. I use the RAM mounting system. You just attach a RAM ball to the handlebars with a C-clamp or get one that screws into a mirror mount hole - or any number of other mounting options. Your LeMans should have two unused mirror mounts. Then you need an arm and a cradle that is specific to your GPS unit. These are available on Amazon, GPS City, and other sites. I like the RAM system because it's pretty common and super durable. I rented a bike recently, which had a RAM ball on it. Therefore I was able to use my own GPS (which also runs on batteries). Garmin (and aftermarket suppliers) make special wires that power the GPS. My 60 series can be powered through a specialized plug or a USB cable. I use the special plug on my dirt bike and a USB port on my V11. The USB connection vibrates out or looses connection sometimes, which causes the unit to restart. I'll probably put one of the special wires on soon, because it stays connected. "GPS - take me to tacos..." -
David - for what it's worth, I paid just a bit less than that for my Scura less than a year ago at a dealer. It had less than 200 miles - so basically brand new. In comparison to the Scura, the Cafe Sport won't require you to buy a whole new flywheel/clutch setup. It also has all the refinements that go with the 2003 and later models. That's a highly desirable V11. So, yeah, the ask price may seem a bit high, but if it's in pristine, unmodified condition (which it appears to be) - then you will not have much in the way of post-purchase costs unless you choose to modify/personalize it. The dealer will probably give it to you with fresh tune, fluids, and filters too.
-
Looks to me like the carrier bracket on 02/03 is the same casting - but the 03 has a hole in it for the special bolt. I think you could drill a hole in the 02 bracket and use the special bolt (part #34 in MY2003 image in Camn's post). It would be relatively easy to mark the location for the hole when everything is still on the bike - just use a center-punch after removing the bolt.
-
Canadians are too nice to be Scuristi.
