MartyNZ
-
Posts
1,010 -
Joined
-
Last visited
-
Days Won
43
Content Type
Profiles
Forums
Events
Gallery
Community Map
Everything posted by MartyNZ
-
Aye . . . +48 would be A LOT "richer" than stock. (Factory V11 CO setting is usually in the minus 30 range). Yet, I'm not sure just how much the actual air-fuel ratio is changed with the "CO fuel trim." Meinolf said "The CO trim value is not part of the BIN. The value is stored in the EEPROM in the ECU, and that’s not read or written with the Reader and Writer software." So now we know that the previous owner of DD's 15M ECU, before Scud, set the fuel trim to +48. No wonder DD was melting the seal on the "Coaltrack Road Raceway" proving track. I still had a 3000 rpm hiccup occasionally with my Ti ECU, even with +15 CO trim, before Meinolf fixed things. So I wondered why DD was so pleased with his new Ti ECU. Now I know. So now both DD's & my bike have 15M ECUs loaded with Meinolf's #42 .bin file. My bike has CO trim at 0, standard airbox, & Ti mufflers, and it is behaving well. DD's bike has CO trim at +48, a shark gill exhaust weird thing that sounds awesome, crossover under the alternator, and intakes are still a work in progress. I can see another visit to Coaltrack Road coming up for my computer.
-

Ratchethack... for President?
MartyNZ replied to ScuRoo's topic in Special place for banter and conversation
Don't get me started!All the progressive innovators of NZ lost the vote for the flag change to the 'stuck in the past', 'no change' bog dwellers. The BDs were probably still angry that we adopted decimal currency and the metric system, and thought "we had enough change last century". So the NZ flag still looks like the 'Straylian flag. A crying shame. (You will notice that I have been quite circumspect with my own personal views on this subject, so as not to offend anyone, but still, what were the dimwits thinking?) -
As vuzzi said, you could check the cap resistance. They will unscrew from the lead, and should be 5k ohms. If you fit new caps, remember that Italian bikes run best with red caps and plug leads.
-
Octane ratings are hard to compare between countries. Research Octane Number (RON), Motor Octane Number (MON), and Anti Knock Index (AKI) are different measures of octane ratings. Australia, New Zealand, & parts of Europe use RON. Canada, USA, & parts of South America use AKI, which is an average of RON and MON. You may see (R+M)/2) on the pump. AKI is 4 - 6 units lower than RON for the same fuel. We can buy fuel with alcohol from a few Gull outlets in NZ. A brewer here has an ad campaign "drink more beer and save the world" as they sell Brewtroleum at Gull outlets. I'm doing my bit to save the planet. Who's with me? https://youtu.be/gfxGpGmpDPs https://youtu.be/QuRT8lkSZno
-
Are the cylinders getting to the same running temperature? Rich mixture means cool running, and uneven temps mean uneven mixture between left & right. What do your plugs look like? A leaky injector will make one plug sooty, while the other remains good. Both plugs the same probably indicates a tuning problem.
-
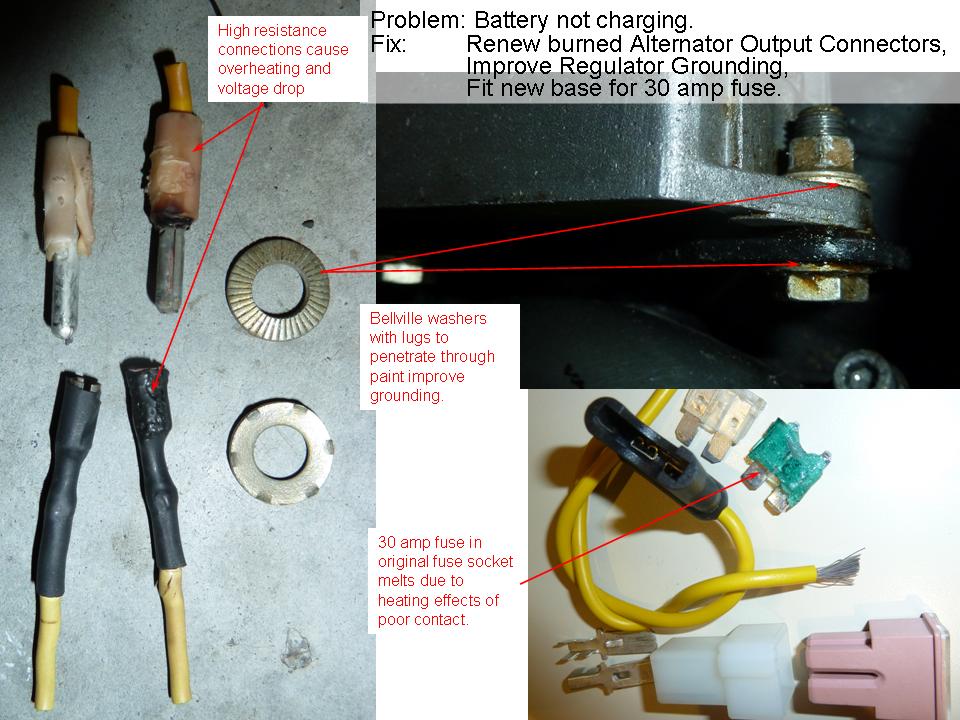
My local auto electrician offered me an automobile fuse & fuse holder. Its not red, but it is cheap, and is not so big that the seat won't latch down. See the pink fuse in the bottom RH corner of attached photo.

-
I've been thinking about this, and I agree with Kiwi_Roy, when he said in post 13 of this topic "As you can see the fuses aren't blowing, it's just a high resistance that causes heating". The ONLY possible way that a fuse can melt without fusing is if there is contact resistance between the fuse and fuse holder. All the other things that I and others mentioned can worsen the problem, but a bad connection is the cause of heating. You need another fuse holder. When you have fitted the new fuse holder, fit the fuse with great gobs of vaseline or similar. The grease will squeeze out to allow metal to metal contact, but should keep the connection tarnish free for years.
-
Would you like to borrow my battery so you can narrow down the cause? My bike has an oil leak from a valve cover, so will be off the road till I get another gasket and fit a helicoil for one screw.
-
Twelfth South'n Spine Raid 2016
MartyNZ replied to Blueboarhound's topic in Meetings, Clubs & Events
How did George have time to make such a great video? Doesn't he have a TPS to adjust, a relay to replace, and alternator wiring to fix? Where is the episode on the oil leak, and the tune-up? And not a hammer in sight! Unless he has one of those bikes that you just ride? -
Fueling with the engine running!!!! not only a risk to yourself but everybody else using the petrol station. Lucky the station attendant didn't catch you, he would have had kittens.I'm sure that Nigel was following all the procedures for "Hot Refueling" after completing a hazard reduction risk assessment, and was wearing OSH approved PPE.
-
Hi Nigel, Could it be magnets coming loose inside your starter, jamming the armature? See this post, including advice on fixing it. http://www.v11lemans.com/forums/index.php?showtopic=19296&hl=magnets&do=findComment&comment=208196 Marty
-
Indicators can do odd things if you have a bad connection to ground on one indicator. It will then find a ground through another lamp in the circuit. I'd be looking for one of the indicators negative connection loose, corroded or broken.
-
If the regulator is not perfectly electrically connected to the negative ground of the bike, then there can be electrical resistance in the connection. Resistance can be caused by rust in steel, oxide on aluminium, tarnish on copper. Age, vibration, and weather make electrical connections develop resistance. In a 12 volt system, resistance matters a lot. Imagine your regulator is rectifying the AC voltage coming in from the alternator, and regulating the output voltage to say 14 V, and outputting 20 amps to the bike & battery. Now add 0.1 ohms of resistance between the regulator body and the battery negative terminal. That is a tiny resistance, but it makes a difference. Ohms law says E=IxR. Voltage = amps (current) times ohms (resistance) 0.1 ohms x 20 amps means the regulator ground is 2 volts above ground. The regulator is happily putting out 14 volts, but the positive lead is now at 16 volts relative to the true ground. Imagine what would happen if there was even higher resistance to ground. Diodes fry, fuses & wires melt, battery gets hot. It is possible that voltage regulators get replaced when the problem is poor grounding. Just bolting in a new regulator can disturb the corrosion underneath to get a better ground, for a while. I believe that mechanical scraping, wire brushing, rubbing with scotchbrite, then assembling with grease is the best way to make good connections. The metal faces of connections must be oxide free (shiny), and I suspect that most electrical cleaning sprays are not active enough to do the job properly. Very few multimeters can detect resistance below 0.5 ohms, so you just have to do the tedious chore of disassembly and mechanical cleaning as a 100,000 km maintenance task.
-
Kiwi_Roy has told us about the importance of good grounding. Grounding the regulator to it's mount, the mount to the engine, the gearbox to the battery, all should be shiny metal to metal connections assembled with a grease such as vaseline or similar to keep out moisture and oxygen. I think he is right. If the regulator ground voltage is above battery ground, then the regulator output voltage could go high, meaning higher current output, resulting in heating at any high resistance connection (like a tarnished fuse holder).
-
Applying gasket compound around the seal is a good precaution against leaks, and a light smear will ease seal installation. Same with the precaution of lubricating the seal lips during assembly. If the scratch is deep, it is worthwhile to burnish any raised edges of the scratch down to the level of the bore, to stop damage to the seal static surface as you press it in. The ball end of a tiny ball pein hammer can be useful here, or any smooth rounded hard surface.
-
Threebond makes good automotive sealants, but 1211 is white and 1215 is grey. Either colour would hardly show against bare aluminum casings. However, black casings would look better sealed by a black sealant if you want to avoid an obvious split line. Threebond 1207B or Dow Corning 3-0100 are black. This will let you "cut down the visual clutter and focus on the large elemental shapes". (I still like that idea).
-
Hi Chuck, Cash1000 (Nigel Register) is on the road. He said to me in a text: "in Blenheim on way back from guzzi rally. Electric start not going. Having to bump start bike. Battery's charged so not that." He tells me that he still wants one of your extenders. I can pay for him if you need cash today.
-
Can you powdercoat your gearbox? Is it realistic, and does it offer any advantage over paint? I have the same problem with bubbling paint and unattractive finish, but thought that powdercoat may be more durable. What made you select paint over powder?
-
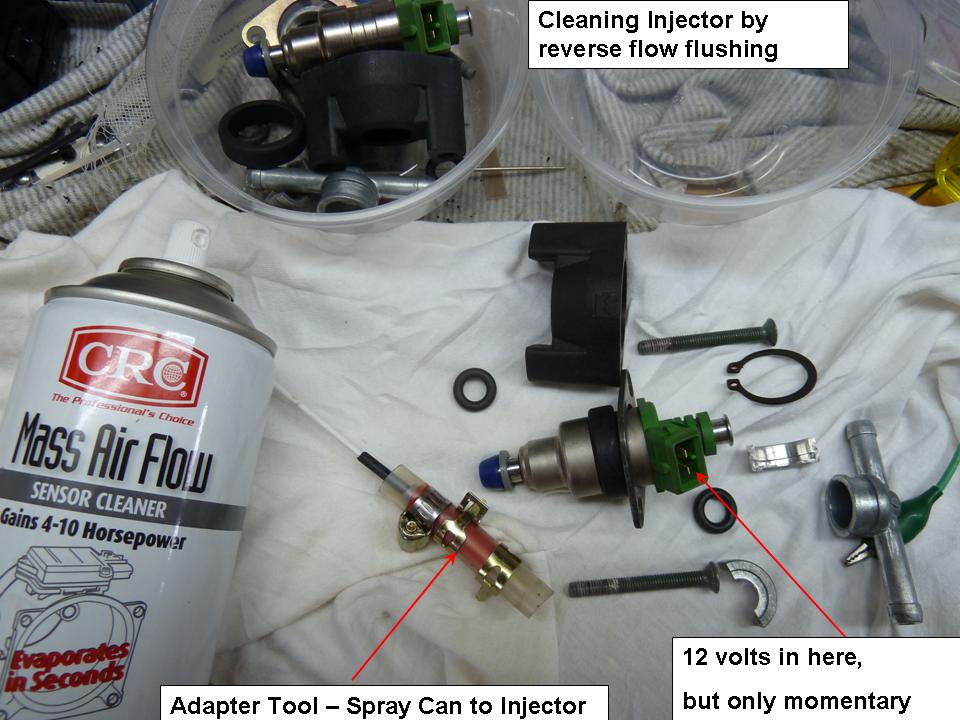
Maybe cleaning the injectors will help?While I had the tank off my bike to change the fuel filter, old cracked fuel hoses, & put a heat insulating sleeve over the pump, I found that the fuel tap inlet screen was mostly covered with what looked like brown fluff matted into felt. Maybe the fuel filter was coming apart, or it got some dirty fuel. I saw more of this in the pump intake screen, and a little in the pressure regulator screen. Any debris in the pressure regulator means debris in the injectors too. I took the injectors out and back-flushed them. You need lots of patience to get the injectors out, and that is a good time to clean the throttle bodies. I adapted the nozzle of a spray can of throttle body cleaner to the outlet nose of the injector, applied pressure from the can, and momentarily pulsed 12v to the injector (without sparks setting fire to everything). Cleaning fluid bubbles out the intake and hopefully carries away the stuff that makes your injector dribble. Then I reversed the rig to blow cleaner in the normal intake end. I got spray patterns about 1 metre long, 200mm wide. If I was thinking, I would have tested the spray pattern before I back flushed the injectors, but no. While the tank was off, I sloshed detergent and hot water through it to get any more debris out. Ran better after that.
-
A new record for me, 4,000 travel to purchase a Lemans
MartyNZ replied to not-fishing's topic in 24/7 V11
Four and a half days on the road is hard to beat Mark. I had it easy for my bike. Drive to Christchurch airport (10 minutes as the light was red), catch a plane to Palmerston North (one hour ten), meet the seller who rode to PalmerstonN from Wanganui, (one hour), then leave the bike at the local Honda dealer (one hour), fly back to Christchurch (one hour ten), drive home (8 min cause the light was green) . Then waited three days for the transporter to deliver it to Christchurch. It didn't start right away, probably pissed about sharing a truck with a Harley. Then I had two attempts to get a box of muffins delivered to the Honda dealer. There is more than one motorcycle dealer in Palmerston North apparently. So it took 4 days to get the bike, but it was much less effort than your epic trip. -
Went to a motorcycle training course today. It was the Ride Forever silver course for returning riders, for sharpening urban & open-road riding skills. http://www.rideforever.co.nz/ It was a full day of lecures, practical demonstrations, and a ride to Hilltop, with Dan Ornsby offering critical advice over radio on the way there & back. I thought that I was a competent rider who didn't need much advice, turns out I was wrong. Ride Forever has a link to an article about why we may not see some things on the road, or from a motorcyclist point of view, why sometimes we are not seen. http://www.londoncyclist.co.uk/raf-pilot-teach-cyclists/ It is an awesome course, so next I'm signing up for cornering techniques training on Ruapuna Track. All Kiwis would find this both intesting and helpful. And it only cost $50 (subsidised by ACC). My bike was the only Guzzi there. The instructors came over to look at it, and they just stared. I couldn't tell if they were thinking "WTF is that?" or "what a great looking bike!"
-
Does the camshaft run in plain aluminiun bores in the crankcase? If so, could the noise you hear be the camshaft rattling in worn cam journals? I saw this type of wear in old CB450 Hondas. Or could the cam chain and tensioner need reinspection, perhaps the chain has become loose and is flailing around.
-
If you don't have 35mm film handy, I've heard of someone making a seal scraper cut from a plastic water bottle. Or you could buy one of these: http://sealmate.net/ or http://www.riskracing.com/pages/Seal_Doctor_Page.html
-
Yesterday I loaded Meinolf's ECU .bin file #41 onto my bike. Meinolf has done a pretty good job developing that map. I did this preparation to the bike, mostly at Meinolf's recommendation: Step 1. Tighten loose clamp on RH cylinder intake hose, as I noticed black soot was marking the intake manifold stub. Snort at 2000 - 3000 still there, but much reduced. Step 2. Check valve clearances. Found inlets both at 0.20mm, and exhausts both at 0.25mm. Adjusted all valve clearances to 0.25mm. Valve lash noise increased a little, 2-3000 rpm snort not noticed on short run. Step 3. Check TPS is set between 0.150 & .157 volts, with RH throttle disconnected and butterfly fully closed. Found set at 0.155 volts, not adjusted. Approximately 1mm slop noticed in RH throttle butterfly shaft at bottom. A rebushing job for next winter. Step 4. Close both air bleed screws fully, instead of half a turn out, and set idle on LH throttle stop. Seems to idle just as well as before, 1100 when warm. Step 5. Synchronise throttles using manometer at 4000-5000 rpm. Slightly uneven synch at idle, probably due to air leaks in throttle body shafts. Runs well. Step 6. Set fuel trim to zero, from +15. No noticable difference. Step 7. Load Meinolf's super bin file #41, replacing titanium kit firmware. Awesome! It starts up to a stable idle without needing to touch the throttle. No need to wake the neighbors anymore. It seems smoother in the off idle transition to 2000, with no hesitation, and it feels like the power curve is flatter. I know that I wanted to believe that it would be better, so perhaps part of this is in my imagination but it seems more willing at all revs, and inspires greater confidence in low speed manoeuvres. I will give it a few more days, then I will try #42. I wish I had a dynamometer in my garage to quantify the differences. My bike Configuration, - Original airbox, with OEM paper filter and rubber intake snorkels. - The plastic velocity stacks are smoothed to remove moulding edges & bumps. - Original air intake temperature sensor inside the air box. - Original cylinder head oil temp sensor, but fitted into a brass pocket, MG part no. 30163301, packed with heat sink compound (thermally conductive paste). - Original headers without crossover in front of the engine. - Original crossover - Titanium mufflers. - ECU 15M without lambda sensor So thanks to Meinolf, I'm off to work with a smile on my face, and bin file #41 working it's magic. ***Edit 17Oct2016 Report after a week: I won't be going back to the previous Titanium ECU map I saved in case I needed to. Next step is to try Meinolf's super bin file #42. ***Edit 29Jan2017 #42 is even better. However it might be too rich, as a guy behind me said he could smell fuel, and the oil temp doesn't get above 80 degrees C. I'll see if reducing fuel trim gets it under control, or else I will have to start learning how to use Tuner-Pro.
-
OEM Part Name: Lens - Turn Signal / Indicator - Amber Moto Guzzi Part Number: GU02753700 Replacement Part Brand or Source: Moto Guzzi / Aprilia Part number or other identifier: GU06753700 Differences from OEM (if any): Grey/Smoke colour instead of amber. Other Compatible Vehicles: Moto Guzzi Griso Other Comments: May need Amber bulb to replace standard bulb. Website link for source: http://www.tlm.nl/en/parts/or https://www.motointernational.com/store