docc
-
Posts
20,496 -
Joined
-
Last visited
-
Days Won
1,189
Content Type
Profiles
Forums
Events
Gallery
Community Map
Everything posted by docc
-
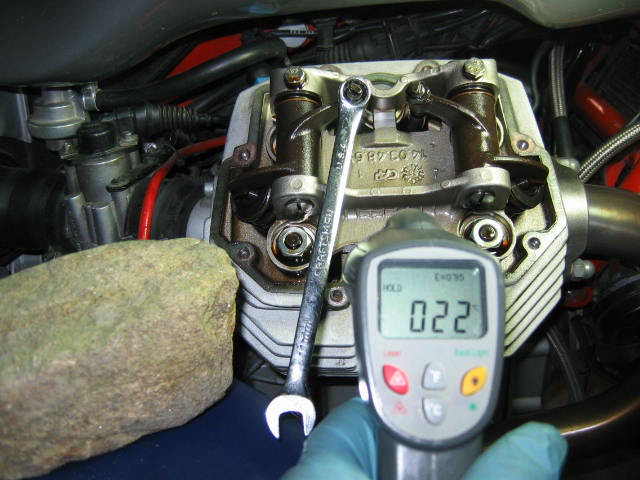
Yeah, I was always told "stone cold", but I did some careful measurements using guzzidiag to monitor engine temperature and checked the valve lash over a period of time. I was surprised that the motor cooled 90% and the lash returned to the "stone cold" spec after just 40 minutes. A Very Experienced and well respected Guzzi owner/tech told me the same at this recent Spine Raid. More detailed post here: http://www.v11lemans.com/forums/index.php?showtopic=19137&p=205658 The great thing about this discovery is that it removes the hassle of having to wait overnight to do this procedure. The six steps above can be performed in a couple hours tops.

-
My recollection is that silicone will gradually form a silicon dioxide ("glass") layer on any switch or relay contacts from the effects of the brief arc that occurs as the contacts make or break. Glass, of course, is a tremendous insulator. Also (again, my recollection from a knowledgeable person), that Ford Motor Company discovered infiltration of wiring for a considerable distance leading to concerns of the formation of silicon dioxide and degradation of electrical conductivity. Being a poor scientist myself, these are just recollections of statements I found compelling.
-
Ten Spine Frames: Blueboarhound Daytona Josh Sport 1100 docc 2000 V11 Sport, silver brlawson 2000 V11 Sport, black nobleswood 2003 Sport Naked, red scott2525 Ballabio footgoose 2002 LeMans, red/grey JRD 2002 LeMans, champagne Nick Coppa Italia Jake Rosso Corsa, (rosso, of corsa!) Other Guzzis: 1200 Sport The Tennessee Tuxedo Stelvio NTX danl Stelvio über alles Wayne Orwig Hotdog&mustard EV Bill Hagan Honorable sportbike twins: BMW RS, red Gary 'zuki SV1000, silver Bill from Indiana carbonfiberducatirocketship Tim the Enchanter Oh, wait, not the "breakdown" of the attendance? The Tennessee Tuxedo had a weak valve cover gasket that got exponentially worse after attempting to tighten it. No other mechanical issues, only "Tech."
-
Beautiful photo of a beautiful LeMans! I had planned on getting to those falls this year, but alas - I'm glad you guys did!!
-
 V11 theme song?
 -
A recurring theme with running issues of the V11 Moto Guzzi is that a decent tune-up often effects an amazing improvement. It is The First Place to start. This past weekend, we collectively tuned two V11 in the garage of the South'n Spine Raid. Both bikes sounded fabulous after and the members have given good reports on the results. While the *suggested* procedure is fresh in my mind, I figured to get the basics down. There are several ways to achieve a tune-up on a V11, some more time effective and some more elaborate. This one strikes a balance that is approachable by most owners with a little effort and a few tools. ___________________________________________________________________________________________________________________ 1) Valves/ Plugs: When cool (after the bike is off ~45 minutes), remove the plugs, adjust the valves to 0.006"/0.008" (.15mm/.20mm), then gap and install fresh plugs. 2) TPS Baseline: Using a Casper's TPS Breakout Harness (or equivalent), disconnect the right throttle linkage, release the upward facing slotted screw for the high idle cam, back out the difficult to reach 2.5mm hex-drive right-side idle stop set-screw, and clean the throttle butterfly, throttle return spring, and the underside of the throttle bodies (if necessary). It is critically important that the throttle plate is COMPLETELY closed and all of the above have been seen to! Many say to even "snap" the throttle closed a few times (within reason) to seat the plate fully closed. Others "zip-tie" the throttle plate firmly closed. Otherwise, you can simply apply a firm, constant pressure with one hand to ensure the plate is COMPLETELY closed. This indexes the throttle opening to the entire fuel-ignition mapping and cannot be over-emphasized. Loosen the TPS fasteners only enough to tap it or budge it slightly, it is VERY sensitive. Changing the TPS fasteners to standard hex drives (from the factory Torx) simplifies the process (M4-0.7 thread pitch x 17mm long). With a quality voltmeter, connect the positive to the violet/black wire and the negative to the violet (the yellow is not used for this setting). With the Run Switch on, switch on the keyed Ignition Switch. Adjust the TPS to 157 milivolts (most accurate over the factory value of 150 mv). Realize the TPS value changes when it is tightened down, so just repeat until you're in range. Reconnect the throttle linkage and set the high idle cam so it just nudges the throttle when engaged [we will recheck this after the last step, "6) Idle Speed"]. Leave the right-side idle stop backed out. (Some have found using both idle stop screws gives a more stable idle.) (EDIT/May 2019): Having had two TPS go bad after 50,000-62,000 miles/ 79.000-100.000 km, it is simple enough to check the TPS for faults when it is hooked up to the DOM (Digital-Ohm-Meter) . Switch the DVOM to resistance in the 2000 Ohm range with the key off. Slowly and smoothly open and close the throttle body and observe for a smooth transition of increasing and decreasing resistance from the potentiometer (TPS). If there are jumps and glitches or drops and variations in the resistance, the TPS should be replaced. Be certain to set the DVOM back to > DC voltage < before baselining the TPS in millivolts or you'll think something is terribly wrong! 3) CO Fuel Trim: Using guzzidiag software interface (or equivalent), connect your computer to the V11 with the two necessary diagnostic cables. Available from several sources, be certain the OBD cable is properly FTDI chipped. >> Check the Fuel Trim/ CO. If it is deep in the negative double digits, adjust it to zero. That may not be the exact AFR, but it will be immensely better than negative double digits or more (values of -27 to -128 have been reported!). Adjusting the Fuel Trim/CO with Guzzidiag requires the motor to be at operating temperature; simply follow the prompts on Guzzidiag. (The CO Fuel Trim can also be set with TunerPro at any temperature, but that's beyond this basic procedure). >> Don't worry about any other shown values at this point. >> Lambda (oxygen sensor) equipped V11 must have the Lambda sensors turned off in TunerPro. 4) Air Bypass Screws: Turn the upward facing Throttle Body air bypass screws in all the way and back them out one full turn. It is quite common that the tips of these become very sooty along with the passageways. If you have the time and inclination, remove them and clean them and the passageways with some throttle body cleaner. Watch your eyes, Eugene! (There is only a captured O-ring on them and no spring or tiny ball waiting to exit the universe!) [edit/May 2023: These O-rings should be inspected due to their age. Deformed, torn, or damaged O-rings should be replaced.] 5) Throttle Body Balance: Bring the engine to operating temperature. Connect a suitable Throttle Body balance tool like "TwinMax," manometer, alcohol/Hg sticks or the equivalent to the vacuum taps at the junction of the heads. With the white Nylon knob on the left, balance the vacuum at two or three thousand RPM or so (not idle). Make certain the white knob does not interfere with the shock's reservoir or anything else. See that the throttle linkage rod does not foul the speedometer drive on the right side. If you open and close the bell crank of the left throttle body, be certain the cable seats itself back in the groove. [Consider a lock nut against the white knob per Dave Richardson/Guzziology.] Some like to fine tune the idle balance using the air bypass screws, one in a little, one out a little to show good balance at idle. 6) Idle Speed: Let it idle and adjust the 2.5mm hex-drive left-side idle stop set-screw (easy to get to) to put the idle where you and your V11 are happy. Technically 1050+/- 50, I find mine *happier* a little higher (around 1150-1200+). Don't worry over the *degrees of opening* or the TPS idle voltage; seriously, just put the idle where the motor idles nicely for your conditions and liking. Once Steps 1-5 are set, you can put the idle anywhere you want. But you cannot start here. [Be certain the throttle cable has the appropriate freeplay to not pull on the throttle linkage in the idle position. Finally, recheck that the fast idle cam is not making contact, but just nudges the right throttle linkage when engaged.] ___________________________________________________________________________________________________________________ That's a "decent tune-up." I prefer to tune *early & often* finding that even at 5,000 miles (8.000 km), the V11 runs sweeter after setting the valves, fresh plugs, and a throttle body balance. There is a lot that could be added here, and many well informed owners and technicians do things differently, yet this fairly concise procedure has been shown to give very satisfying results with reasonable effort. As always YMMV, for informational purposes only, and no small furry animals were harmed in the testing procedures.
- 189 replies
-
- 15
-

-

-
I had hoped to check a few V11 at the South'n Spine Raid (there were eight!), but it proved more cumbersome than I thought. (*Other* TechSessions prevailed! ) I did hit mine with the IR reader and found the 2nd/Headlight Relay and 4th/ECU Relay about 125ºF and the 5th/FI Relay ~147ºF. That difference would be quite discernible to the fingers, let alone the lips ) Seems the 1st/Starter Relay and 3rd/Neutral Relay were ~115ºF. ("as I recall . . ."). I did not compare that to the surrounding materials. I didn't have time to take notes, so may try to get another reading when things aren't as pressing. EDIT: Notably, my headlight circuit is separated from these relays (#1 and #2).
-
Ten Spine Frames , four other Guzzi, and two V-twin sportbikes from nine States. What a grand time! Best, yet! Excellent, wonderful, fabulous folks! . . . and, of course, no shortage of TechSessions . . .
-
Wow - those are both great companies with excellent products. Any pics of those mounted to a V11?
-
I've long been a devotée of opening, cleaning, and sealing electrical connections. I'm a firm believer that this, alone, has been a huge contributor to my Sport's reliability. From gstallons, Wayne Orwig, and Kiwi_Roy, I learned that silicone based "dielectric" grease is anathema (bad medicine) to reliable electrics. Petroleum jelly only, then! *Vaseline über alles!* I've been using CRG Electronics Cleaner since it's available locally, but have long been intrigued by the lure of Caid Deoxit. Seems that could be more than one product though? Somehow, I always get confused *which* Caig Deoxit to use? So, I bring this deep and abiding query to The Mighty Favog . . . http://vignette1.wikia.nocookie.net/muppet/images/c/c3/Snlsketch1.jpg/revision/latest?cb=20061217032757
-
-
Hahahaha! Right? "How many miles CAN you get out of a rear tire?" "I dunno, I went on a Spine Raid instead . . ."
-
Same nut that revels in engine braking down through the gears like he's in a 427 Ford GT40 at LeMans? hmm - I resemble that remark!
-
Courses are laid in, weather-eye on the horizon . . . Brand new rear Pirelli Angel GT . . . leaning up in the corner of the shop . . .
-
Several years back at a Spine Raid, I remarked at a guy's new-looking Teknos. "Krylon satin black," says he. Since then, I scrub mine and *dust* them with a satin black spray paint every couple years. Works pretty decent!
-
I love my Tekno panniers I wish they fit further forward (I don't carry passengers), and the later generation racks and bags are better built
-
And the 57% rear weight bias?
-
Excellent! This is so-freakin'-great! Can't wait to see you, man!
-
Whaaaa? Oooooh . . . .
-
+1!
-
No, that's what I do, your upper lip is very sensitive, I'm not trying to burn you LOL There's a fine line between simple Wire Nuts and true Sparkies!
-
Whew - so, if I wanted both (Pirelli) tires to wear out at the same time , perhaps a Diablo front "Sportbike" tire, and Angel GT rear "Sport-Touring" tire? (Links are for reference and go to Motorcycle Superstore)
-
The 4 Angel ST REAR gave me the same average mileage as the last Diablo Strada I ran (~3,600 miles), while the 3 GT REAR gave ~4,100 (I'm on my 4th now and hoping for same). Biggest difference I noticed with the GT (in addition to the extra 500 miles), is that the last couple hundred don't seem to disappear suddenly into a white stripe of cord. The FRONTS, however: my last Diablo Strada (2009) and 3 Angel ST all gave around 7,000 miles +/- ~100, while the only front GT I've been through went 7,400 (I'm only on my second GT front). So, *maybe* the fronts will also give an extra 500 miles (?) . . . we'll see. Yet, previous Pirelli Diablo fronts (2004-2008/ 6 tires: 3 Corsa, 1 Strada, 2 unspecified) averaged 4,600. My impressions of performance keep me loyal to Pirelli and I do like the improved wear without sacrificing roadholding. I tried a high mileage tire from *someone else* and ended up ~unhappy~ (read: on my side). A couple caveats (YMMV): 1) Apparently, I'm rather hard on tires/ not a very *smooth* rider. But, I have a grand time ripping it up and down through the gears. And, 2) no tires compare to the (evil, squirming) Pirelli Dragon Corsa my sport was delivered from the factory with: 2772 miles.
-
Here in the deep, humid south, I ride more in the winter than the awful summers. Looks like my records show fronts (ST or GT) give me ~7,000 miles to the rear ~4,200. Previous Diablo Strada in their various forms (Corsa, Strada, "Normale") gave ~5,000 miles on the front.
-
I'm posting this for Bill Hagan, and all of us who may have *kissed the tarmac* . . . I got shot off my horse, So what? I'm up again. https://www.youtube.com/watch?v=r2TEqoac3A8