Leaderboard


Popular Content
Showing content with the highest reputation on 11/08/2022 in all areas
-
7 points
-
Machined the blanks yesterday. I have to rework the form tool a little, but should get them formed today. Most likely done tomorrow.. 4 are spoken for. Send me a PM with your mailing address if you want one. $50 plus actual mailing cost.4 points
-
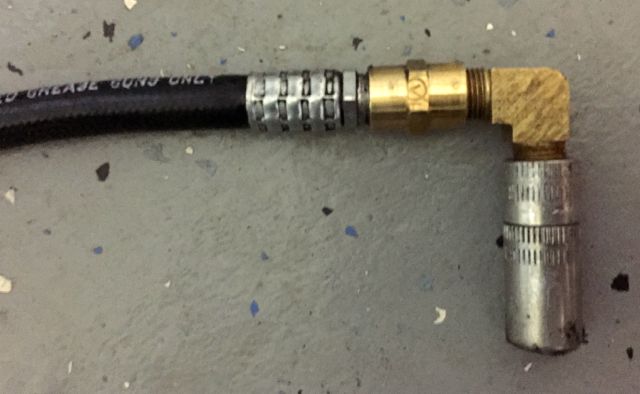
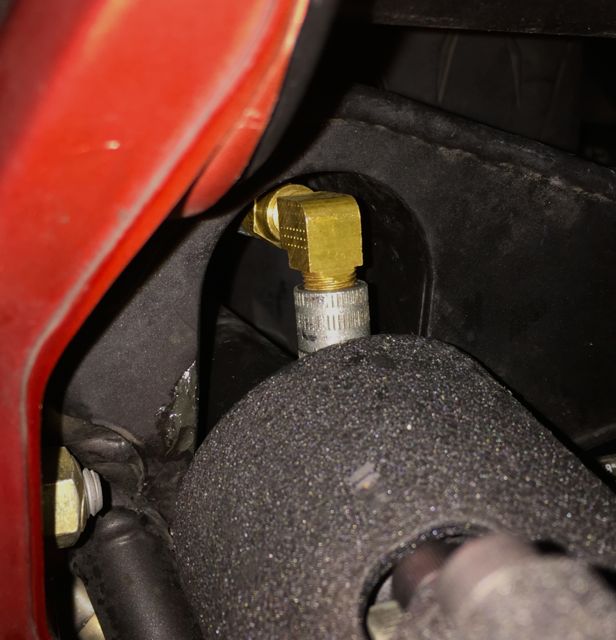
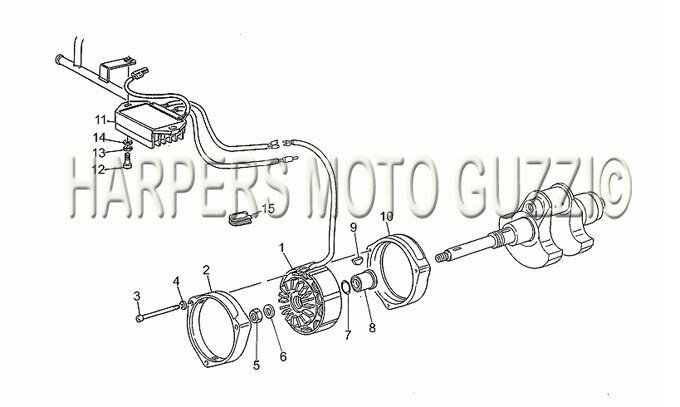
As an addendum, After installing my gears I developed a front seal leak. I blamed it on the seal, but it turned out to be the seal between the spacer and crankshaft. There's an o-ring inside the spacer sitting in a groove that I didn't see- which was hardened and came out in pieces- and on my '97 there is also a tapered relief in the crank end which was perfect to fit another o-ring as insurance. See # 7 & 8.
 3 points
 -
Finally getting around to fixing. The annoying alternator leak was my fault, not the front cover seal but my inattention to the spacer sleeve o-rings. The rear one was absent (there's a rear one, right? There is now) and the hidden one in the groove was hardened and came out in pieces. Meh. The oil cooler mounting pins were torn from the cooler, and the mounting brackets bent. Apply hammer and JB weld, blast and paint to come. The sidestand bracket snagged on the trailer slot rail hard enough to pull the 6mm screw out of the case, so for your enjoyment a 12mm Time-Sert was installed.3 points
-
for your reading pleasure:3 points
-
Docc’s point about the lever adjustment bears reiterating- I’d say take a bit of time to find the setting that gives you the smoothest action- my experience is that makes a surprising difference.2 points
-
After reading this thread, I see now, it's not just me. I'll attempt this front Zerk again this weekend, maybe helping myself by lifting the bike to allow the rear wheel to hang down a bit. If this doesn't allow me to get in there, I'll use this as an excuse to visit fellow forum member @Scud as he is just down the coast from me.2 points
-
See #7 and 8. Don't forget a new sealing o-ring. Mine had a nice relief in the crank end of the spacer to fit an additional o-ring for insurance.
 2 points
 -
I'd try fitting the left pivot pin from the inside, so that the pin swages the damaged outer few threads into line. After that, wind that LH pin out enough to fit the swingarm and RH pin. If you use a tap to recut the threads, you risk having a loose pin if you don't use the correct tolerance tap.2 points
-
OEMTOOLS Plastic Disconnect Set 6 Piece (autozone.com)2 points
-
Well after years of sitting on these puppies I have finally gotten around to fitting them.The fit is very nice indeed. Elegance. Original chain drive in good condition after 42,000klms The original cam retaining bush which had almost zero wear at 42,000 klms which was a surprise. The updated cam retaining bush. Note the oil feed reliefs machined into the front face to improve lubrication. I had one of the new ones on hand but otherwise I would have just die ground the reliefs. The Lucky Phil cam/crank holding tool.Being the lazy type I made this up with very low expectations but it worked a treat. Just goes to show sometimes you can overthink things and simple is best. Leverage is your friend...sometimes. Gears installed and ready to button up. From the other side. New crank seal installed. Be silly not to. Gears were greased lightly for the first start. I pulled the ignition pickup and put 500ml of oil in there so the gears have some lube for the first start. This area of the crankcase only gets the oil from the front main bearing and cam bearing leakage plus any that might slosh forward under braking from the sump. So the gears rely on the oil pump gear picking up trapped oil in the bottom and flinging it up the gear train and crankcase vent oil and main/cam bearing overflow. Hence filling the well so to speak. A new metal timing cover gasket also installed. Now to replace the manual fuel tap that decided not to shutoff when I was pulling the tank. Faulty somehow. Not very safe to have liters of fuel pouring out the fuel tap with the tank halfway off and not able to be dropped down again so the fuel hose can be connected. After that its the gearbox support plate to install.1 point
-
Here's mine, no makeup or expensive jewelry.1 point
-
Funny how much that actually matters. Mine has adjustable levers, and if it didn't I'd find some.1 point
-
Thank you Marty, Just for the clarity, here I found a similar thread in this topic: https://wildguzzi.com/forum/index.php?topic=104932.0;prev_next=prev#new1 point
-
That's a beautiful looking ride I've been around lots of Ducatis, but I really don't know all the model differences,attributes etc. It looks like it would handle extremely sweet. I'm shocked that a Supersport S 939 has such a relaxed looking, higher bar ergos, is that stock? Please share some of the fine details about it, ie desmo , belts, valves, weight, power etc,,, especially once you put some miles on it. Congrats, wishing you many safe miles and smiles.1 point
-
It's true about changing out the fluid. My 07 Norge clutch was working fine but too close to end of lever for my comfort to feather it. Flushing and filling with new Dot 4 brought back "Crisper" feed back.. Helped. I love the sound of the dry clutch rattle when I pull in the lever.1 point
-
Thank you all, non-adjustable! This is my second Guzzi and it snatches a bit more than my V7. Having already flushed all fluids, I'll start working on more delicate hand activity.1 point
-
I forget if this is your first Goose? If so, you may have Japanese wet clutch expectations. At best, Guzzi dry clutches have a short engagement and at worst are snatchy. My 'Sport takes a practiced hand to pull away smoothly at low rpm. My '89 Mille, even with the big smooth engine and flywheel, takes genuine concern or I'll stall it. The kid's '85 LeMans though, is butter-smooth with a wider engagement than either of the others. But none of them tolerate the carelessness of a good multi-plate wet clutch. They're more like driving a loaded tractor-trailer. Also, if it's been stored, the friction surfaces may be a little rough from 'oxidation'. If so, they'll smooth out considerably with a little usage.1 point
-
+1 on footgoose's flush/bleed advice. The only adjustments in the clutch are at the lever. There is the matter of setting the "reach" of the Brembo lever for your hand size and engagement preference. And there is a lever adjustment that contacts the master cylinder plunger. Having to change this contact may indicate a possible broken spring inside the master cylinder.1 point
-
Please note the various nicks and cuts on his hands from previous attempts 😉1 point
-
I found the video on youtube that I mentioned above, copied in a link below. I don't bother with releasing the fuel pressure first like he does, I just wrap the whole works in a rag to catch any fuel. Thousands of guzzzi owners are indebted to this video poster for solving one of life's greatest mysteries.1 point
-
The waterjet guy called and said the blanks were done, along with the exhaust flanges for the little 3 cylinder radial I'm working on, so rode and picked it up on this really nice fall day. So. I have the blanks and when the weather turns bad (probably next week) I'll run them. If you want one, PM me with your mailing address, and you will be in line for the Shirley no doubt last run of the Lucky Phil Extenders.1 point
-
wow... excellent milage, whats been done recently does it use oil, mates got 130k on a griso puffs a wee bit but nothing done to it1 point
-
In my sometimes awkward, or even embarrassing, position of calling back over my shoulder to other V11-ers to look out for someting-or-another, the front U-joint has remained an enigma. No doubt, the access to the nasty bugger changed with the LongFrame (for the better) in 2002. We know, now, that the spine frame, itself, made its new length at the headstock while the swingarm and frame side plates remained unchanged. The only thing I can see, or propose, is that the redesigned, "braced" rear lower subframe allows the swingarm to tip down ever so slightly more than the early un-braced subframe giving just enough clearance to get a modified grease gun contraption on (and off) the Zerk. Like many others with a ShortFrame (RedFrame or Rosso Mandello), I resigned myself to removing the swingarm every third rear tire (about 12,000 miles/20.000 km for me). It is really a straightforward prospect. With a lift and proper jacking, tie-downs, light, tools, time, and an air conditioned space with a coffee maker and a beer cooler . . . Also a great opportunity to address and handful of other important tasks: rear brake bleed (nipple up!), clutch bleed, clear the gearbox vent, inspect and rotate the swingarm bearings, inspect the torque reaction rod bushings, inspect the shock eye (lube its bushing and grease the pivot bolt), and ABOVE ALL: grease That Bloody Farking Front UNI Joint! Whether I did not get to mine often enough or it just went as long as it could before freezing in one direction, who knows. But a U-joint with one direction of motion becomes a J-joint. [cue docc, calling back over his shoulder: "Grease that bloody, farking front UNI, boys!" (even if you have to pull your swingarm . . .)]1 point
-
Finally, a clinically derived solution to properly treat That Bloody Farking Front UNI Joint on of the early ShortFrame V11 . . .1 point
-
Just my tuppence worth. I also had that bloody annoying stumble! Mine was between 3 and 4 k and yep on a whiff o throttle. It used to piss me off rolling through a town at 60k's in third ( 3 thou ). The thing that cured it was when I had the useless standard tensioner replaced with the Stucchi unit. I was with the mechanic when it was done and can verify that it's CRAP!! That was about 30 thousand k's or probably more ago and no stumbles. We found the issue because my timing gasket failed and noticed how little tension the original had on the chain! Cheers Guzzler1 point
-
@dangerous - yeah, I was *hoping* the slave would bring my clutch back (but it didn't). I actually put it in by only removing the rear wheel and exhaust. That was before peeking in past the back of the crank to see a glimpse of my connecting rods. @gstallons - So, that U-joint is correct? Perhaps the guard was designed for the Sport 1100 series and the access hole aligns with that driveshaft? I've about convinced myself to just pull the swingarm every third rear tire, dose the UNI joints and give the swingarm bearings a good spin.1 point
-
and those bearings will not come out easy Heat and press, the assembly team lives in N Italy. The disassembly team left the country in '441 point
-
It occurred to me the rear U joint nipple is probably in the same orientation to the crux / shaft as the the front, when nipple is bottom side, might help visualising.1 point
-
I wondering the purpose of the collar. Stopping a fragged U joint piece from going through your balls? Vital. Stopping stray boot laces from sucking you into the works. Pretty handy. Catching the drive shaft if the joint falls apart, preventing suspension tangling in it. Bonus? Containing slung off grease. Gimme some of that.1 point
-
How did you possibly get that photo? Colonoscopy?1 point
-
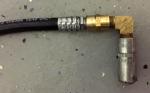
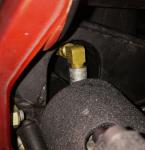
I just figure this out yesterday and posted in another thread, then someone referenced this one. So here are the essential details: Modify the grease gun with little brass fittings from the plumbing section of a hardware store. Get the smallest right-angle bracket you can find. Then, with the bike on the sidestand (no parts removed), push it until the fitting is pointing up. Then thread the grease gun's tube through the driveshaft tunnel and pop it on the fitting. Takes 15 seconds. Grease to your heart's content. Let there be no more swearing at the front uni joint.
 1 point
 -
The front half of the shaft is only removable from the gearbox output with the swingarm off. Otherwise, with the bike supported and rear wheel off, the bevel box comes off easily by pulling the shaft apart (make sure the reference marks are visible or add some). With the front u-joint rotated with the Zerk on top, it may be possible to get some grease in it with all the methods posted above combined with cursing and swearing. And since you've got the cursing and swearing down already, hell, you're halfway there!1 point
-
i have never managed it without removing the swingarm.1 point
-
Of course with your rear wheel off the bike, you're only 10-15 minutes away from having the swing arm off and the entire driveshaft removed for inspection, cleaning, and re-greasing. You can also tend to your swingarm bearings at the same time.1 point