leroysch
-
Posts
216 -
Joined
-
Last visited
-
Days Won
6
Content Type
Profiles
Forums
Events
Gallery
Community Map
Everything posted by leroysch
-
Works for me.....
-
-
I guess that would be..hmmm....essentially east, eh? Sounds good!
-
Sweet! Enjoy......
-
Veglia again, again.. pointers and repair.
leroysch replied to Niels Knudsen's topic in Technical Topics
Thank you, Sir!- 11 replies
-
- 1
-

-
- veglia
- speedometer
- (and 2 more)
-
Ditto on this. I hadn't left enough slack in the harnessing going into the ignition switch during my foray into switch lubrication. At full lock, I was able to disengage the removable bottom "cup" of the ignition switch assembly. Exhibited the same symptoms...
-
KTM curse....or some other travesty? Glad your adventure has everything back home and a plan forward....
-
New rear tire arrives tomorrow. I'll let them socialize for a bit.....and if the weekend weather isn't inclement, may even leave her in her "room" to see if she really prefers to pout vs getting out to strut her stuff .....(anyone know where I can get a tee with "Anthropomorphic" emblazoned front and back?)
-
Jus wundrin likes...
leroysch replied to stewgnu's topic in Special place for banter and conversation
My 2004 has never marked her spot. -
Lordie no, at the rate the day that verrry bad girl would've never let me get out of the dealer's parking lot if I dared put the KTM between my legs! Seriously, short of a major fail which I trust would have already been mentioned in the various bike-specific forums or magazine road tests, it takes me a few hundred miles...at least...to make a final judgement as to the efficacy of any future addition to the stable. Usually do without.....
-
I knew it was bad form, but after discovering a KTM dealer only 50 miles away with an in-stock 1290 Super Duke decked out for sport tourer duty I figured why not combine a V11 ride with window shopping? I barely got underway before the rear brake expressed its discontent with my intentions by refusing to obey foot commands. Since this was just a leisurely ride and not corner carving, NBD. Made it to the dealer and ogled the bike (surpisingly erect seating position, hoses going to all sorts of unusual places for that push-button suspension adjustment stuff I read about, looks like it has an servomotor controlled valve in the exhaust after the cat converter for euro noise compliance, single-sided swingarm...and the bags looked ginormous). It does have a..distinctive..look, something like a streetfighter grudgingly accepts the audacity of hard luggage while its sibling dirt bike heritage is still there somehow. The ride home was uneventful but enjoyable, of course. The recently added GPS and voltmeter were working and the speedometer bezel (which has come off twice) was secure. The bike was running strong and the previous uncertainty in the front end I had felt in previous outings apparently been solved by adding a few psi to the front tire. It hadn't been outrageously low, so I was surprised at what a difference it made. Pulling into the garage, taking off my helmet, shutting the garage door, and heading into the house I stopped, hearing this loud hissing. Well....I hadn't spun up the air compressor recently soooo....sure enough, I was able to witness the V11's rear tire giving me the equivalent of..the bird....as its opinion of the outing. Total round trip was ~100miles. Glad it wasn't 110......
-
Enjoy...and welcome!
-
I swear I'll take a shower next year...errrr......I mean...y'all are slow!
-
You know it! Even considering washing and waxing the bike. Might even scrunch down and take a swipe at the wheels......
-
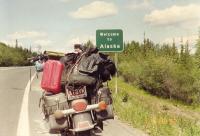
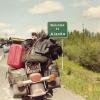
Wandering in the vicinity of Cedar Vale,...took a break from the traffic in Sedan, KS.
-
Appreciate the thought, Scud. I tried that first with my best simulant of a RAM ball (some washers on an appropriately threaded bolt). Using what I had..and doing the eyeball extrapolation....I wasn't convinced getting a stand-alone ball was going to allow the GPS (Garmin 66X) to clear the fairing.
-
Found some room to mount a GPS. Clears the fairing and no interference lock-to-lock.
-
Mine had the boot too, but between the magic ointment on the connections and, perhaps, an ill-advised spritz of silicone spray to the boot itself to keep it pliable, darn thing won't stay put. The plugged hose was discovered after I took the starter cover off, just laying on the starter. It's a mystery (to me) for now. It passed my critical inspection (hmmm....screw's in there pretty good...if it's meant to plug the end, it's still doing its job) so I just zip tied it to something stationary and moved on!
-
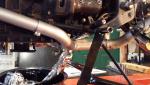
After somewhat routine winter maintenance (valves, fluids, tires, fuel & air filter, relay replacments) and in the midst of a GPS/Voltmeter install I decided to check and see if the patient still had a pulse. Welllllll, no current draw to the starter, but some chatter at full handlebar lock. Took the ignition switch apart without mangling it too bad, lubed it with my preferred non-conductive ointment, then moved further aft: Ugh! And, the 12V trigger, removed in the pic, was marginally attached. Between this. a battery suffering from a winter's worth of disuse, and a loose positive connection at the battery I'm hopeful the patient can be removed from life support (trickle charger) soon.
-
Oh man, my ECU is upside down. It never stops.......
-
Gratuitous Pics of Girls + Guzzi
leroysch replied to sign216's topic in Special place for banter and conversation
..and thus..bar-end mirrors were born. -
It truly is a labor of love...not nearly as intensive as your endeavors... Orange, orange, red w/black(blue(?)) stripe, black Surprising amount of corrosion on/about the relays... Have the Omrons at the ready...interesting difference in two of the spades' width Greased the clutch switch bullet connectors by the frame neck (LH side), was able to make out most of the crankcase breather once I stopped relying on the parts manual depiction. Need to take the airbox completely off to visualize it completely...I stopped at replacing the filter...found that one of the screws holding a side panel on went MIA. Surprisingly, sourced those M5 flat nylon washers online from WalMart for cheap..with free shipping.
-
Pushing 11,000 miles, I decided to put the knowledge I've gained from the forum to good use. New rubber, front and rear, and...voila... Didn't bust a thing. Best tip was to relieve the fuel pressure by separating the two electrical connectors coming out of the fuel pump (2004, internal) and turning the engine over briefly. Didn't do my homework, though, cuz while I have a new fuel filter I don't have the fuel pump gasket. Does anyone know the purpose of these threaded fasteners on the "spine"? And one more....this is by the battery. Purpose? While the tank is off I'm thinking I'll take advantage of the battery tender pigtail and run a line to the front for a GPS. Be nice to configure this as a sport-tourer for road trips.
-
Rear tire installed, valves adjusted (we'll see just how re-usable those elastomeric gaskets really are), and front wheel off for a new tire. Interesting process for axle removal (type I per the manual). Glad I had a 30mm socket and found that the steel bar in the tool kit which I presumed went thru the holes in the axle to worry it out was way too large. Went a bit anal on the washers used on the two middle bolts going thru the head guards. Their OD wouldn't quite fit. Mr. Dremel to the rescue.....
-
Oh..and adding Al foil to shop inventory.....