Leaderboard


Popular Content
Showing content with the highest reputation on 02/06/2023 in all areas
-
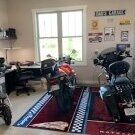
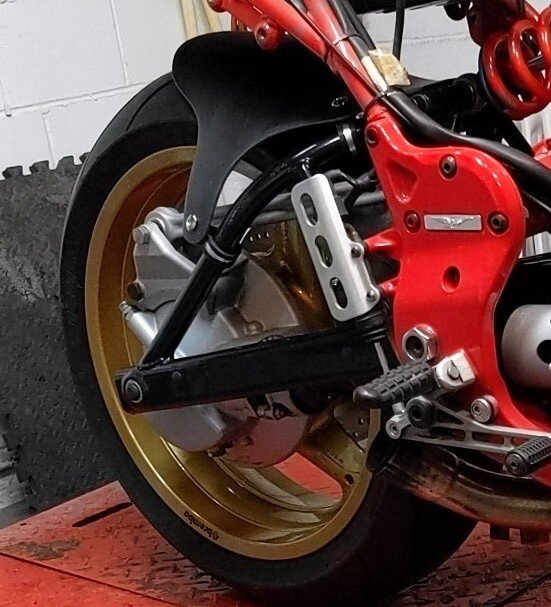
Hugger mod, swingarm captured screw delete, powder coated wheel, new wheel bearings.
 7 points
 -
It can't be a 2002 as they weren't built then. All 8V's, (And all Stelvios use the 8V motor despite the early ones being designated '4V'.) manufactured prior to the middle of 2012 used the flat tappet top end and they all fail. There are no exceptions. Some may last longer before they make a noise than others but make no mistake, they ALL fail. The only cure is to convert to the roller top end and there are four different kits to achieve this depending on year and model of machine. If people would like I can post up my 'Definitive guide to rollerisation' here but someone, presumably a mod, will need to insert the pics as I can't seem to work out how to do that here. Other major factors to be aware of are swingarm and shock linkage bearings which if they haven't been greased by a previous owner will require replacement and it is wise to replace the sump spacer gasket between the sump spacer and the block with one of the thicker aftermarket gaskets available as they tend to blow out around the front oil delivery gallery if the shitty original gasket is kept. Finally, make sure that the previous owner has not used a K&N type air filter and that the drain hoses from the airbox are intact, attached and plugged. This is very important as the 50mm TB's are very sensitive to damage. Also check that the yellow paint on the throttle stop screws is intact and they haven't been fiddled with, few workshops seem to know how to tune a W5AM Guzzi and if the throttlebodies are messed about with by someone who doesn't know what they are doing it is possible to turn them into scrap very easily. They are no longer available as a spare part. The stock mapping is pretty pedestrian. The W5AM has been an open book for well over a decade. There is no need to pay preposterous money for 'Reflashes' as you can swap maps easily and safely using Guzzidiag 'Reader' and 'Writer' programs and there are several aftermarket suppliers who can offer you much improved maps in both closed and open loop format for little or no money. You will need a laptop with Guzzidiag downloaded but you should have that already for your V11. You cannot tune a W5AM bike without it. Just saw your last message. 2012 was the changeover year to roller tappets. Only way to be certain is to lift the rocker cover and look. If it is still a flat tappet bike it will require an 'A' kit to rollerise it.4 points
-
The owner asked me if I could post this here: HMB-GUZZI is now HMB-MOTO as of today, we have changed our internet access as well as our email addresses. The shop itself will remain unchanged, the existing customer/login data will continue to apply. The new shop address: www.hmb-moto.de The new email address: info@hmb-moto.de4 points
-
Oh they'll have their foibles too. I believe the V100 uses the same swingarm bearing set-up as the CARC bikes which means first order of the day with it will be to pull the swingarm off to pack them with grease.4 points
-
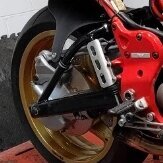
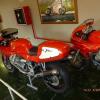
The wheel is the later 5.5 x 17 with a 180/55/17 Michelin Pilot. The powder coat was done by IPC in Rockaway NJ. Cleaning up the powder coat masking at the cushdrive interface was time consuming. It’s completely hidden, but the cushdrive sealing o-ring rides there. 83 degree valve stems were installed, new bearings were installed (and the rear spacer shimmed out to 113 mm, thanks docc!). I removed the stock fender / swingarm cover / hugger and carefully, incrementally, cut it, test fit and trimmed until I was happy. I had also done this on my Silver V11. I like the look. I have some pics of a few cuts but reducing the file size is tricky for me, I don’t know which apps I can trust with that access to my phone! Anyway, it’s held in place with standard rubber protected pipe clamps from a local hardware store. The Rivet Nuts in the swingarm that hold the stock fender hardware on were removed by inserting a ~20mm long, 5mm thread button head screw 2 turns in and carefully hammering on the button head until it allowed easy extraction with some needle nose pliers. 10mm black plastic flush furniture hole plugs press into the empty holes. The information decals on the swing arm were removed with a heat gun. Also in the photo is a 500 lbs Eibach spring on the stock Sachs shock. I need to send my Penske out for a revalve, as funds allow.4 points
-
Oh what fun. V100 sounds better all the time!3 points
-
I'll bet @Lucky Philhas3 points
-
I didn’t install them, but I think they may be Ducati pegs. Early monster?2 points
-
In my (now Son's) '85 LeMans, I installed Carrillo rods, cut the heads .010", and installed a Web 85b cam. It's dead smooth compared to stock, at any RPM. The lesson here, of which I have many examples, is that 'engine balance' and especially 'factory balance' are theoretical models coupled with testing to achieve a target RPM at which the engine is smoothest. If you ride outside the bell curve of balance, or you like the higher and and your particular engine tolerance stacks to balance at a slightly lower RPM you get more buzz. So then let me state for the record that piston weight is not any sort of structural threat, and only affects balance in a small way- sometimes making it better, sometimes making it worse. Flat track engines (back in my day anyway ) were often balanced to a factor of 100%, which kept all the vibration in the horizontal plane, with the claim that it helped traction. Certainly, at very high RPM in lightweight solid mounted frames it kept felt vibration way down, which was probably of more benefit than any claim to traction. This is sort of rambling, but balancing engines which are not used to the margin of their structure is simply a matter of comfort.2 points
-
It's highly unlikely they will have been looked at. Likewise the shock linkage bearings. Which CARC model are you looking at? Ask in the 'Newer Models' section if you want and I'll fill you in on the things you have to check.2 points
-
Sorry, wrong button, Mopar and interesting news = thanks. Cheers Tom2 points
-
Hi All. Hey Deadpen.... What is the upper gearbox bracket about? I don't know if I have one or need one??!! '03 v11 Lemans here. Hey activpop.... I found the driveshaft on my v11 Lemans to be out of phase too, someone had neglected to phase it with factory alignment marks that were properly marked. And, the same character that fuzzed up shaft alignment probably was the one who installed the large i.d. washer that normally resides between the rear drive & swing arm installed it between the wheel drive splines and rear drive drive splines. I'm glad I realized what was going on there because it resulted in only half of the wheel splines engaging into the gearbox splines. Crazy, eh??!! Art2 points
-
I was saying the same thing a year ago except my alternative was an R Nine-T! Once you get done fact finding and get this bike sorted it will be worth it! Have you sourced an upper gearbox bracket yet?2 points
-
More details please!2 points
-
Yep, it is a bad Zerk fitting...rusted shut. Took it out and free flowing through the hole. Gotta get some of them and check/remove the front uni. If it is notorious, I suspect it will be worse than the the rear. Learning little by little what to look for in these bikes...mostly an owner who has taken care of the little things so they dont turn into big things. Good thing I got this for a good price.2 points
-
You can verify that the marks are correct by seeing that the trunions of the front and rear shaft yokes are aligned. [image courtesy of @Baldini]: And, yes, the rear should slide off. It makes me wonder of grease having hardened in there. How about some judicious heat from a heat gun or hair dryer (just remember to put it back before the wife reaches for it in the morning!) . . .2 points
-
2 points
-
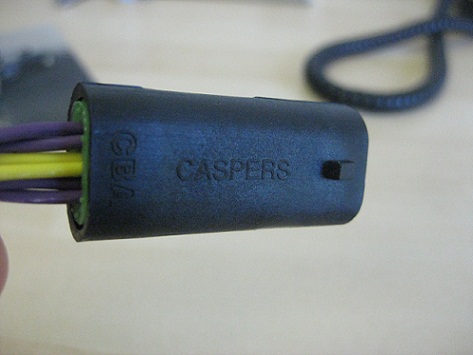
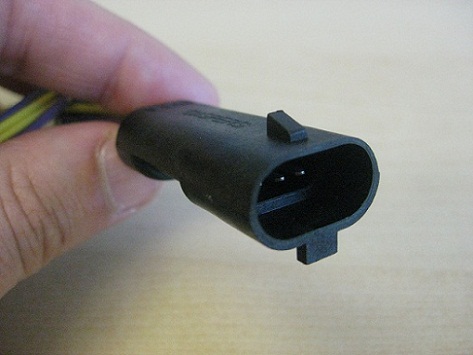
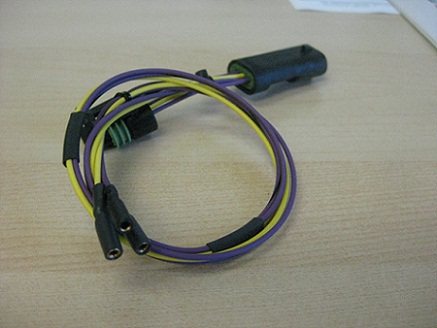
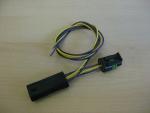
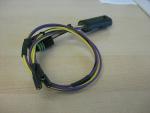
There are three necessary cables to set the Throttle Position Sensor (TPS) baseline and interface with the ECU: 1)TPS Breakout Harness: http://www.casperselectronics.com/cart/index.php?route=product/product&product_id=853&search=109172 And the thread posted by danl that details the development: http://www.v11lemans.com/forums/index.php?showtopic=18052 [Cable shown is my breakout harness modified with connectors I can clip my voltmeter to. N/Vi (purple with black stripe)is positive, Vi (purple) is negative. The third wire (yellow) gets tucked away. Also shown are my old pins to back probe the ECU connector. ] 2) Adapter cable: Do a web search for "3-pin to ODB II Fiat/ Lancia" for current availability in your location: 3) OBD II to USB with correct FTDI 232RL chip: (Do a web search for current sources): ! >> Lonelec (UK) has been the most reliable, long running source for both cables 2 and 3 << ! New, improved version (2022) with adapter to accommodate various cabling/ devices: https://www.lonelec.com/product/guzzidiag-3pin-interface-cable-kit/1 point
-
No idea, mate. But I reckon there's a pretty good chance. I can't see Aprilia or Piaggio inventing new pegs for every new bike they release. I'd be looking for some second hand pegs, even ratty ones just to see if they fit.1 point
-
Stelvio came out in 2007... What model year are you looking at? All 1200 CARC before MY2012 came out of the factory with flat tappets with DLC coating that fails overtime and need to be "rollerized". That would be the number 1 concern!1 point
-
The drop in pistons are supposed to be the same weight as the originals, but have higher compression. If your piston weight changes, or the piston and / or rods are not the correct weight, you certainly can run into vibration issues. I am not sure that Guzzi built motors with connecting rods that were the wrong weight (lighter or heavier, either one would vibrate). But it is certainly possible. It is also possible that they simply did not properly balance some engines. Vibration can be caused by balance issues. Or it can be caused by tuning issues (the two cylinders not running evenly).1 point
-
Don't what those ones are, but if I recall correctly, a V11 that I was considering buying allegedly had Breva 1100 pegs. I could imagine they might go straight in.1 point
-
Dunno about a "sweet spot", but Ernst (who really does know what he is talking about, far more than me....) mentioned a crucial point. He suspected con rods heavier than spec. You wrote about having changed the pistons. Both of those (can) mess up the balance of the motor, and make it vibrate (and in the worst case, self destruct.). As far as the conrods go, if one were to suspect that as an issue, one would have to find out the correct weight and weigh the ones in the motor. As far as swapping the pistons goes, I would weigh the old ones and the new ones. If there is any difference, the crank should be re-balanced (as far as I know). Same goes for swapping the conrods...1 point
-
For what its worth as a mere mortal to the experts on this forum. I owned a 2001 Silver V11 Sport new that I later added a Fast by Ferracci drop in pistons, FBF Power Commander w a custom map made to make peak horsepower, lastly FBF carbon exhausts. What Mike Wells & I created was one of the coolest deep toned 2v Big Block Guzzi's ever. We also created a vibration machine that even with Throttle Meister heavy bar end weights couldn't resolve, leaving you with numbness on demand. Many years later, my new to me, low mileage V11 Sport Rosso Mandello is running a custom map (idle is higher), everything balanced to spec with stock bar ends, no power commander. Riding to the 22 Spine Raid last year, rarely did it create enough vibrations in the seat or the hand grips to create the same sensation as the FBF Silver V11 Sport, remember I'm 20 years older. *So there really is a sweet spot on these bikes as far as tuning is concerned to make them more comfortable, again devoid of the technical data supplied by the elite mechanics on the Forum.1 point
-
Hi all Some of the red frame V11s had an issue with severe engine vibrations. There is no way to cure that with foam or silicone grips or bar end weights. I remember a road test in an italian motorcycle magazine by Alan Cathcart with a very early V11 that mentioned also the engine vibrations. My very much beloved black V11 from 2000 was also one of the bikes affected. I was happy with the bike until I changed bike with a friend of mine driving a Lemans3. He was shocked by the amount of vibrations generated by the engine. Me too experienced how smooth the old Lemans engine was running. The red frame V11s suffered of two factory rework issues: one related to the gearbox, the other to the conrods. For my chassis number only the gearox rework was listed and carried out by my fellow dealer. I suggest my bike suffered also the rod issue. Guzzi mentioned the rods were prone to crack on bikes frequently revved near the engine rpm limit. My conclusion was the rods on the affected bikes were too heavy and so the engine balance was out of spec. For my bike there was nothing to be had from Guzzi, so I decided to balance the crankshaft myself. At 9k km I dismounted the engine from the frame and teared it down to bits. I weighed all the parts necessary, calculated the master weight and put it on the crank pin using lead sheet stripes. The balancing was carried out only statically on a balancer very similar to tools used for tire balancing. My crankshaft needed removing of material mainly in the area of the crank pin. When the engine was completed and reinstalled, the running behavior was absolutely different: The severe vibrations were gone, the engine was almost smooth as the LM3 engine.1 point
-
The hugger modification looks great Any additional photos from other angles or in-process would be helpful. What bike are those rubber foot-pegs from, and were they a direct bolt-on with no modification?1 point
-
The wealth of info here is great for a new guy like me...thanks for all the input. I'll be checking on this too. Although I would like to put this on the lift, I think I can keep it sturdier on the floor. Swing arm coming out next weekend. At least it's not riding season yet.1 point
-
The upper gearbox bracket was feature on the pre-V11 Sport. It can be fitted, with some fiddling, to the early V11 Red Frame Sports, but not the Rosso Mandello ShortFrame. Risk of a gearbox case crack at the mounting point is theoretically mitigated by the addition of this bracket to a Red Frame. Later (2002 and on) LongFrame are braced across the gearbox at the bottom from the lower rear subframe and no frame bracket for this piece.1 point
-
Sounds like a good time to remove the swingarm. It is not a bad job with the bike well supported. This gives full access to the front U-joint, inspect the swingarm bearings, bleed the clutch, service the main electrical ground to the back of the gearbox . . .1 point
-
1 point
-
You might want to be absolutely sure about what you are doing. You could end up w/a very expensive lesson.1 point
-
you might try hydraulics. Use your grease gun on the zero fitting and see if you can get it to move. If so , just remember to clean out some of the grease so you put it back together1 point
-
This is so for the LongFrame V11, 2002 and on, with the 5.5" rim. Early, 1999-2001 ShortFrame V11, Sport and Rosso Mandello, have 4.5" rear rims and were delivered with 170 tires. Similarly, many have found that mounting "too pinched", which alters the rounded profile and have settled on a 160.1 point
-
I agree, as I don't do much night riding, it's not much of an issue for me. Installing either an LED bulb or an HID (although they've mostly been surpassed by LEDs) is always going to result in a compromise. The H4 shell optics are designed for an H4 bulb and anything else will probably result in more stray light and possibly reduced performance. Some of the reduced performance will be overcome to a degree I suppose by the sheer brute force output of LEDs. If you just want to be seen during the day though IMHO an LED bulb is a good way to enhance visibility to other road users, but could become a liability after dark. My preference is to install an LED unit and not a Chinese cheapy. There are a few YouTube channels where some folks did extensive testing on many units. As I recall the JW Speaker's products scored consistently high on the ratings and nearly all the Chinese offerings were woeful.1 point
-
Some explanation of what I did to install the Koso Thunderbolt LED Headlamp The bike had a Bosch H4 Unit installed as standard & looks better, don't think there wold be any argument there. The Unit is very large and the hole in the fairing to accomodate it is approximately 306mm diameter The Koso Thunderbolt lamp is 170mm diameter. This left a large gap and as the unit doesn't have a bucket would also be deeper in the fairing After looking to try to find a suitable bucket and failing I came across a trim ring on Ali Express https://www.aliexpress.com/item/1005002252489460.html?spm=a2g0o.order_list.order_list_main.9.775d1802WuUIaq This would take up some of the gap, but wasn't wide enough, to protrude into the fairing from the mounts that the headlamp mates to. So I ordered 2 with the idea of joining them together, the outer diameter of the tirm ring was 190mm. That would reduce the gap from approx 18mm (36/2) to 8mm (16/2). I'd also have the issue of how to secure the headlamp and the trim ring to stop it freely rotating. The Bosch butted onto the mounting tabs and tightening the tabs to the bucket prevented it rotating. Eventually in desperation after running out of ideas I used Gorrila tape to join the 2 trim rings together. To my surprise this worked much better than expected and the trim rings were quite secure. I also needed to buy 2 thread reducers from E Bay as the trim rings were tapped for M10 and I needed M8 Using a 5mm sponge strip, usually used for draught excluders on doors, I placed that around the headlamp and squeezed the trim rings onto the headlamp. To stop the whole thing now freely rotating I got longer bolts that bottomed out inside the headlamp then using nuts between the lamp and the mounting tab I could screw them onto the mounting tabs on the inside, clamping the bolts onto the tabs. As the bolts also bottomed out in the headlamp and the trim rings were secured to the lamp with foam it was held captive. Sort of difficult to explain so this picture might help to make it clearer, you can see the nut on the inside clamping the tab Finally I need a rubber trim to take up the gap between the trim ring and the fairing, somewhere around 8-9mm. After a few fails I purchased a some D rubber strip, this is normally used to seal doors, hatches etc: The one I chose would usually be used for hatches on boats. As the inside is hollow it can be compressed down to squeeze through the 8mm gap and expands back out either side and worked a treat. https://www.ebay.co.uk/itm/112139428859 Not sure if that helps or not1 point
-
H4s are about 3/4 down the page. Daniel Stern is one of the largest OEM lighting engineering firms in the world. He's also a classic Mopar guy which is how I came to know him. There's 6 metric tons of knowledge on his website. I haven't reviewed it lately for updated LED information but it doesn't seem that he sells any. I haven't replaced my headlamp bulb since owning the bike, but when I do I'll buy here rather than risk the attendant problems with unproven LEDs. http://www.danielsternlighting.com/products/products.html1 point
-
obligatory Norton, Duc Lotsa nice builds, brews and food.1 point
-
Hrmm, I have some of Noco's other charger products, which are very nice. The pricing on the batteries is reasonable too. May have to look into these1 point
-
Agreed! I've been using these grips on various motorcycles for 20 years. They have a great feel, tame vibrations, and have great grip. I also filled my factory "clip on" bars with lead shot and silicone, and have the heavy Throttlemeisters. That all seemed to help, but it's still a twin1 point
-
Hi guys! How are you? Things have definitely improved but not everything, as we can see. My Guzzis, driven by the V11, are doing great and are always growing in Number 🙂 ... The V11 Scura, after about 85,000km, begins to show some ailments but nothing irreparable. As soon as I can, I change the gear clip, restore the front fork and replace a front disc (which has gotten into play...)... In the meantime I've found another girlfriend, a redheaded milf 😅 that a friend wanted to give me with only 57,000km. The coming season will see me circulating with many Moto Guzzis, one more beautiful than the other, always hoping to meet along the way!
 1 point
 -
For a V11 Sport, @Lucky Phil speaks highly of the Rizoma mirrors on his V10/11Sport:1 point
-
What were Joes concerns?. I looked at this gave it some serious thought. Remember the Daytona engines use the wide sump with gear drive and the same crankcase drain system as the 2 valve engine. The V11's retain some oil in the bottom of the front timing chest area due to the location of the drain holes some way up the front wall. It's no big issue though as there is a lot of oil flowing into this area from the front camshaft bearing overflow, the front main bearing and the oil from the oil pump bearing. This oil simply raises the level until it overflows into the drain holes and the oil pump gear is low in the timing chest stirring up the oil there. I didn't see any great issues with sludge in my engine after 42,000klms. This is why I recommend after after the gears and front cover are installed that 300ml or so of oil is poured into the front timing chest vial the ignition sensor hole to provide some gear lube until the bearing overflow fills the area. I also give all the gear faces a very light coat of grease on all the teeth with a brush. Ciao1 point
-
Simple, really once it's pointed out. The engine has a crankshaft angle at which peak cylinder pressure has the greatest effect (about 20* ATC iirc) so it's not the ignition that matters, but how quickly peak cylinder pressure is reached. Ignition timing is moved to accommodate the rate of burn to get the peak where it does the most work.1 point
-
Ok but as docc points out and I alluded to the Guzzi 15M ecu has no relearn or learn functionality. Later ECU's do for Idle and some car ecu's such as the one fitted to my old Monaro (Pontiac GTO) have quite sophisticated ecu learning capabilities so they can for example detect if the air filter is very dirty and make fuelling adjustments to compensate. They also have "short term" and "long term" learning capability. Sometimes I pick up on phrases and cues to determine an experts actual knowledge to determine what a situation is. Ciao1 point
-
The only parameter my V11 ever "relearned" has been the undauntable effects of gravity. Otherwise, it's 15m ECU doesn't have that capability. Pretty sure that started with the next (W5AM?) ECU in 2006.1 point
-
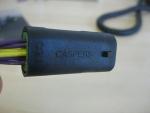
Hey All, I found a company called Caspers Electronics in Colorado that made me an inline TPS breakout harness with colors to match the Guzzi harness for $20! This harness uses one Delphi Metripack 3 wire female connector and one male mating connector of Caspers' own design (which Delphi never offered). Caspers sells the mating connector alone here: http://www.casperselectronics.com/cart/index.php?route=product/product&path=9_60&product_id=561 I know you can just back-probe the connector to measure the TPS voltage. That is what I have done in the past, but I wanted something a little more secure that I could leave connected during a ride to try out some slight adjustments on the road. The guy I dealt with was Dennis (dennis@casperselectronics.com). He finished the harness within a few hours of my request and shipped it the next day. If anyone else wants one of these, here is what I asked for: "I am looking for a TPS breakout harness that is similar in concept to your part #108106, but uses the Metripack 150.2 pull to seat 3 way connector (the oval shaped one w/ the green seal, not the round one) and your mating connector (part # 410016). Can you give me a price for a harness like this?" (the price was $19.95) These are the wire colors of the Guzzi harness: A - Violet B - Yellow C - Black/Violet I didn't specify any wire lengths and he gave me about 20" of unterminated wire for the breakout part and about 2-3" between the connectors. I terminated the breakout wires myself with some 2mm sockets for my multimeter leads. Edit: This harness is now a stocked part (#109172) at Caspers. http://www.casperselectronics.com/cart/index.php?route=product/product&product_id=853 Dan

 1 point
 -
Don't forget to let us all know when you finally put them on Ebay.1 point
-
Pauldaytona and Meinolf are the authorized and experienced experts here but since they are supporting so many forums, I dare to say: The value displayded by GuzziDiag should not be used for the 150 mV base setting. GuzziDiag shows exactly that, what the ecu (no matter if 15M or 15RC) gives out. The smaller the throttle opening is, the less accurate the showed value is (can be easily checked out by using a voltmeter at the same time). This is due to the used analog to digital sampling rate by the ecu. For the "150 mV" basic setting the official instruction is: do not use GuzziDiag, use instead your "voltmeter" (showing millivolts here of course) as always. So three cables are needed for convenience. The "Caspers" to connect the voltmeter easily and the two (Fiat cable and OBD-USB cable) for GuzziDiag. And yes, only the OBD-USB with a FTDI -chip is known to be good (some others have worked also). I have also read that a cable with the FTDI chip is not always easy to find in USA.1 point


.thumb.jpg.6ca2ad474f505dd9ad78d32a82ac6c8a.jpg)